
Sketchbook painting gets super exciting with mixed-media magic—think watercolor cityscapes splashed with inky rooftops, silly animal portraits that pop off the page, swirling galaxy colors, or even dramatic silhouettes over old book pages. Try layering markers, gel pens, textured papers, and splatter paint for eye-popping effects. Weird color combos? Totally allowed! Whether you’re sketching dreamy gardens, food with personality, or abstract doodles, each page is a wild experiment waiting to happen. Stick around—there’s way more wild inspiration on deck!
Key Takeaways
- Combine watercolor and ink for dynamic cityscapes, adding acrylic or marker details for punch and storytelling.
- Layer transparent inks and organic brushstrokes for abstract botanical themes with depth and vibrant color.
- Mix whimsical animal portraits using watercolor backgrounds, bold marker accents, and playful textures like splatter paint or washi tape.
- Experiment with mixed media by combining textured papers, collage, and found materials for unique, textured still lifes or compositions.
- Create surreal or fantasy scenes by blending watercolors, splattering for texture, and enhancing details with gel pens or metallic finishes.
Urban Cityscape in Vibrant Watercolor and Ink

There’s something electric about a city skyline buzzing with life, and painting an urban cityscape with vibrant watercolor and ink is a seriously cool way to capture that energy.
In a mixed media sketchbook, splashing bold, crazy watercolors—think wild oranges slammed against icy blues—makes buildings pop off the page, just like a comic book on caffeine.
Ink swoops in next, letting artists sketch tiny windows, flickery streetlights, or even a pigeon chilling on a wire. Layering watercolor with bits of acrylic paint adds even more punch and attitude.
There’s no set rule: try mixing in people, cars, or even wild rooftop gardens if the mood strikes.
Every urban cityscape becomes a story in motion, alive with bustling energy and your own creative spark.
Whimsical Animal Portraits With Marker Accents

Whimsy takes center stage when sketchbook artists plunge into animal portraits with bold marker accents and a good sense of humor. Armed with their favorite art supplies, they sketch silly cats in sunglasses or dogs with bow ties, letting each sketchbook spread burst with personality.
Experimenting is half the fun—try layering watercolors for soft backgrounds, then grab markers to highlight quirky features like googly eyes or wild hats. Need more texture? Splatter paint or slap on some washi tape for a surprise effect.
Switching up paper types is also encouraged; smooth pages make the markers pop, while rough ones add unexpected depth. Every time they create art in this style, there’s a sense of adventure and loads of laughs on each page.
Abstract Botanical Layers Using Ink and Brush

Abstract botanical layers using ink and brush are all about mixing wild plant shapes with loose, energetic strokes, almost like Mother Nature grabbed the pen herself.
Transparent inks can be swept on in layers, letting colors sneak through and overlap, which makes the artwork look alive and buzzing with energy.
Playing with both abstract forms and hints of recognizable leaves or stems keeps the viewer guessing— is that a fern or just a swirl that decided to be a plant today?
Exploring Organic Brushstrokes
Sometimes, the magic of painting happens when an artist lets the brush dance across the page, following the wild ways that plants twist and turn.
By focusing on organic brushstrokes, young artists can capture the unpredictable beauty of nature while exploring what makes their painting style unique. Using ink adds rich, bold contrast that makes every mark pop.
Layering techniques give depth and complexity, making each artwork a mini jungle of its own. For those wanting to jump in and experiment, try these ideas:
- Play with round and flat brushes to create wandering vines and wild leaves.
- Add water to ink for unexpected, organic blends.
- Layer thin, translucent washes over bold shapes for depth.
- Mix broad sweeps with tiny details.
- Let some lines wander freely for a wild, botanical vibe.
Layering Transparent Inks
Once an artist gets the hang of those bold, organic brushstrokes, they might start craving something a little more mysterious—like secret layers hiding beneath a jungle.
That’s where layering transparent inks comes in, turning ordinary sketchbooks and art journals into treasure maps for new art discoveries. With each thin wash of color, artists can create depth, like peeking through leafy shadows.
It’s all about controlling how much water and ink you use—too much, and it’s suddenly a puddle disaster! Switching up brush sizes or using techniques like dry brushing gives texture, almost like secret patterns hidden in the wild.
Mixing in watercolor pencils or water-soluble crayons makes every layer pop. Patience is key: let each layer dry, and your colors stay crisp and magical.
Combining Abstract and Botanical
Even if it sounds tricky at first, mixing wild, swirling colors with delicate leaves and flower shapes can make a sketchbook page come alive like a secret garden splashed with paint.
This art style pulls together the best of both worlds—abstract backgrounds and bold botanicals. With the right materials including water-soluble ink, a few trusty brushes, and other fun supplies to create cool effects, anyone can engage.
Check out these tips:
- Start with a colorful abstract wash and let it dry before drawing plants.
- Try dry brushing or wet-on-wet for surprising textures.
- Layer detailed flowers over swirly shapes for amazing depth.
- Let parts of your colorful background peek through leaves for harmony.
- Mix mediums like ink, watercolor, and acrylic for maximum magic.
Dreamy Night Sky With Watercolor Bleeds and White Gel Pen
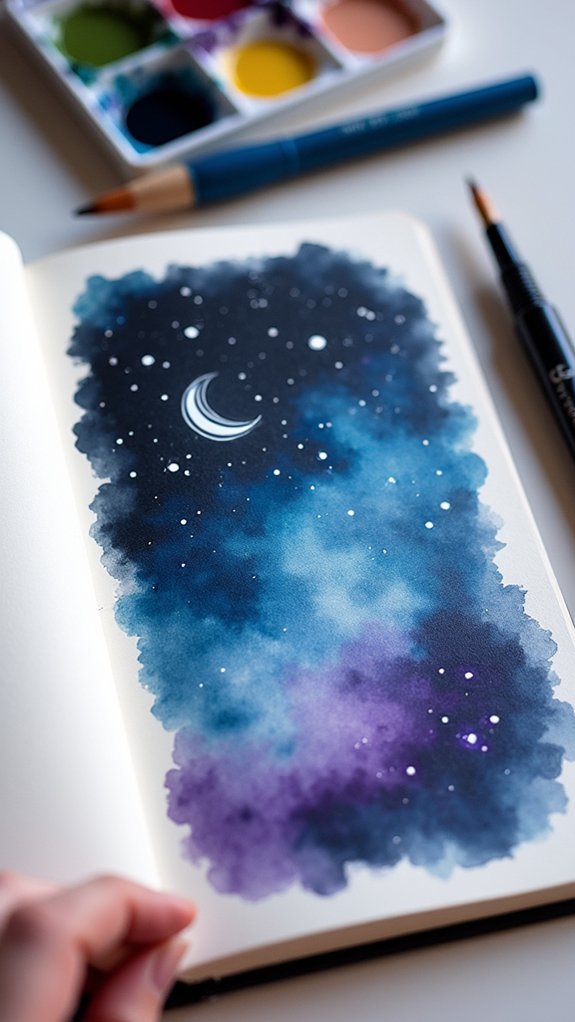
Although painting a dreamy night sky might sound tricky, it’s actually the kind of project that lets creativity run wild.
Get started by grabbing watercolors in deep blues and purples—think of the sky just after sunset, when everything looks magical. Let those colors bleed and swirl into each other on wet paper, making soft, mysterious clouds and shadows.
Once the layers dry, the real fun begins: take a white gel pen and start scattering stars all over, drawing constellations, or even a giant, glowing moon.
Try pressing gently for tiny stars and harder for big, bright ones—you’re basically the ruler of the universe here. If you want extra sparkle, toss in metallic watercolors or a touch of glitter for an enchanting, ethereal glow!
Fantasy Architecture: Combining Markers and Ink Wash
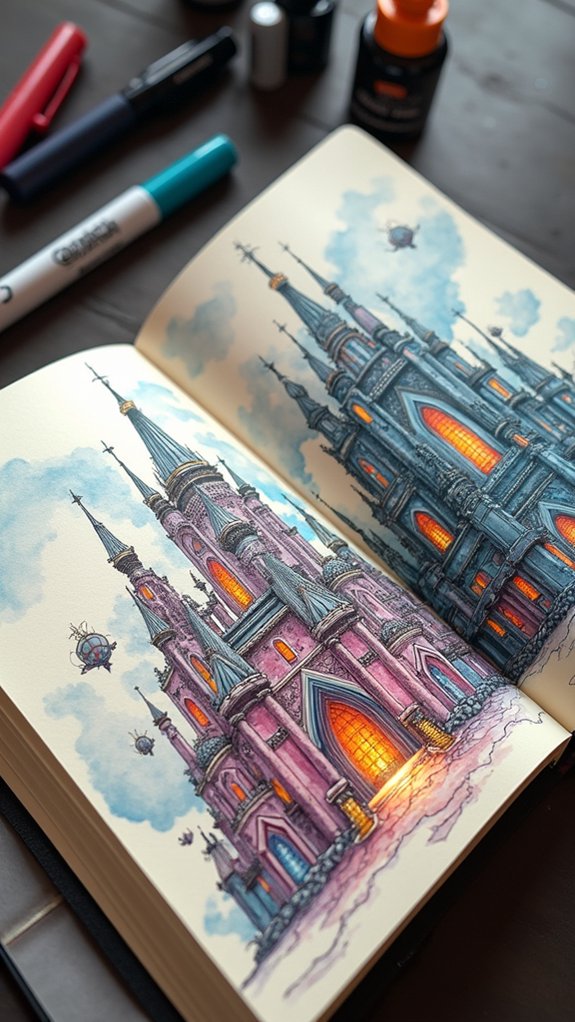
If there’s ever been a perfect place to let imagination run wild, it’s in sketching out fantasy architecture.
With markers and ink wash, even the weirdest ideas—from floating castles to twisty towers—can pop right off the page. Markers make your outlines crisp and your details bold, while ink wash brings oodles of dreamy atmosphere.
Try these cool tips:
- Outline imaginative buildings with markers to set the stage.
- Use the ink wash wet-on-wet to blend shadows and highlights for that magical vibe.
- Layer ink wash over dry marker lines to keep everything sharp and clear.
- Mix up your architecture with floating platforms or impossible staircases for fun surprises.
- Experiment with different marker colors under ink wash for playful, unexpected effects.
It’s pure mixed-media magic!
Surreal Portraits With Splattered Watercolor Effects
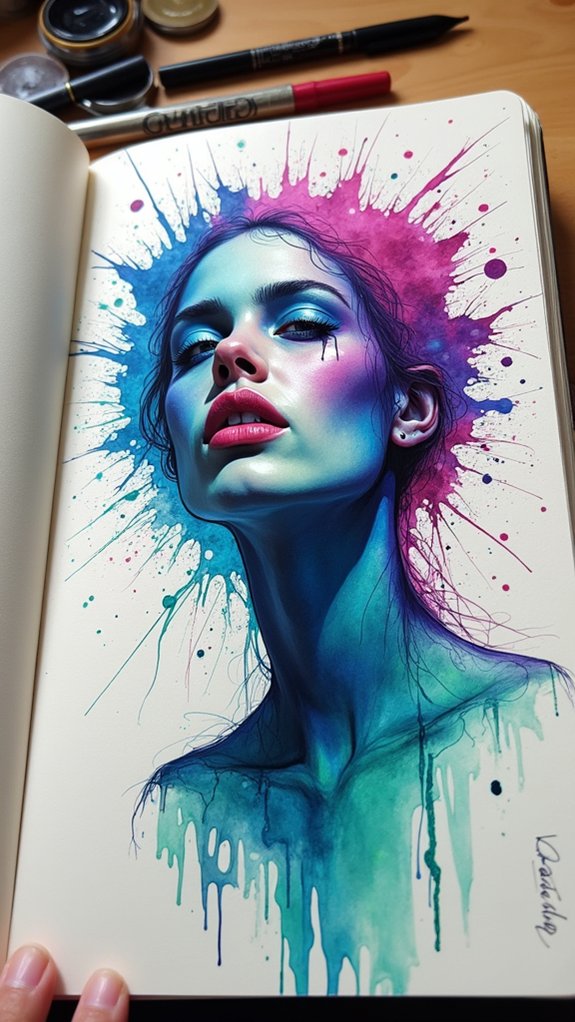
Surreal portraits really know how to catch someone’s eye, especially when watercolor splatters get thrown into the mix. There’s just something magical about seeing dreamy backgrounds swirl behind the face of a portrait, with bursts of color that look like they exploded across the page!
Artists often use a wet-on-wet method for those splattered watercolor effects, where colors meet and mix in wild, unpredictable ways. Sometimes, a toothbrush comes in handy for flicking paint—no joke!
Adding unexpected colors or abstract shapes pushes the portrait into full-on surreal territory, making viewers wonder what’s real and what’s not. Layering the wild splatters over a pencil outline creates sharp contrast, highlighting the mood.
It’s a bold online art trend anyone can try in their sketchbook!
Layered Collage With Inked Silhouettes
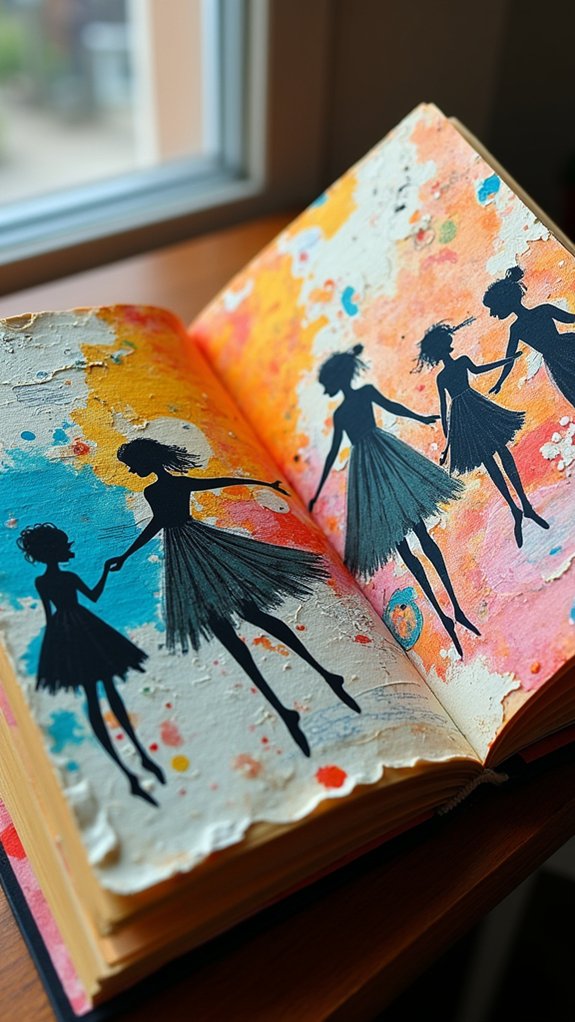
Dreamy portraits with wild watercolor explosions might be a head-turner, but there’s another art trick that seriously steals the spotlight—layered collage with inked silhouettes.
Imagine cutting and gluing scraps of colorful paper, magazine clippings, or handwritten notes to make a textured background that pops right off the page. Then, add dramatic black inked silhouettes—think people, animals, or cool objects—that stand out bold against the busy layers. The contrast is instant magic!
It’s a playground for mixed media elements where anything goes, so let creativity be your co-pilot.
- Mix and match textured and patterned papers for depth
- Add found text or doodles to spice up the background
- Keep silhouettes simple for major contrast vibes
- Recycle old art scraps for eco-friendly masterpieces
- Trust your instincts—randomness often turns out awesome
Watercolor Florals Highlighted by Bold Marker Lines
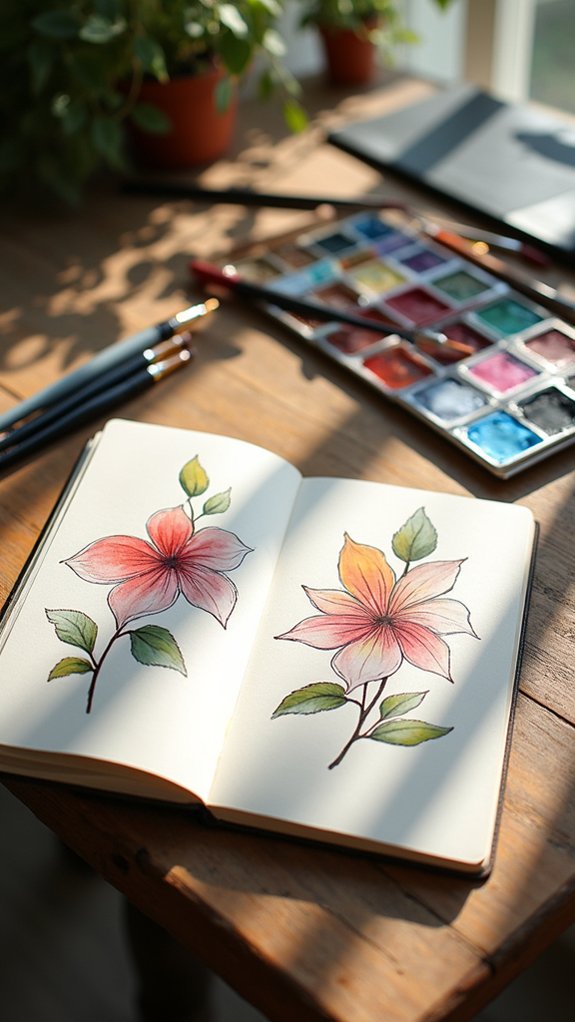
Release a splash of color and watch as watercolor florals come alive with the powerful punch of bold marker lines. When delicate washes of watercolor meet thick, confident outlines, flower shapes suddenly pop off the page—almost like they’re jumping up to say, “Look at me!”
This mixed-media approach isn’t just fun, it gives your art awesome definition and helps each petal and leaf stand out. Blending water-soluble markers with wet watercolor adds some sneaky texture and depth, making your blooms feel extra interesting.
Daring to use different marker colors? Go for it! The more you experiment, the livelier your palette gets. The best part? You don’t have to stick to real-life flowers. Spontaneous doodles and playful colors are always welcome here.
Futuristic Machines With Metallic Marker Details
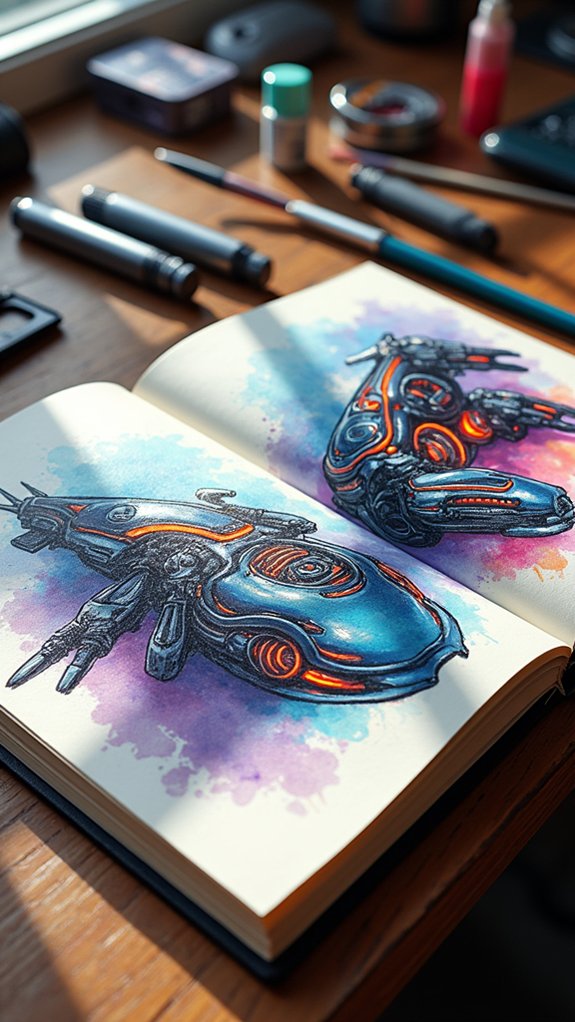
Whenever futuristic machines need a little extra wow-factor, metallic markers are ready to save the day. These shiny pens are like magic wands for bringing black and white sketches to life.
Picture drawing a robot or spaceship, then adding a flash of silver or gold to make the metal parts truly pop. Artists can create the ultimate sci-fi look by experimenting, layering, and blending.
Here are some tips for making the most out of metallic markers on futuristic machines:
- Use fine-tipped metallic markers for teeny, intricate machine parts
- Try layering colors and metallics for a high-contrast, dynamic effect
- Mix black and white markers for sharp highlights and cool shadows
- Work on dark, gessoed pages to let the metallics shine
- Always check your paper to avoid marker bleed-through
Mystical Forest Scenes in Monochrome Ink and Color Pops
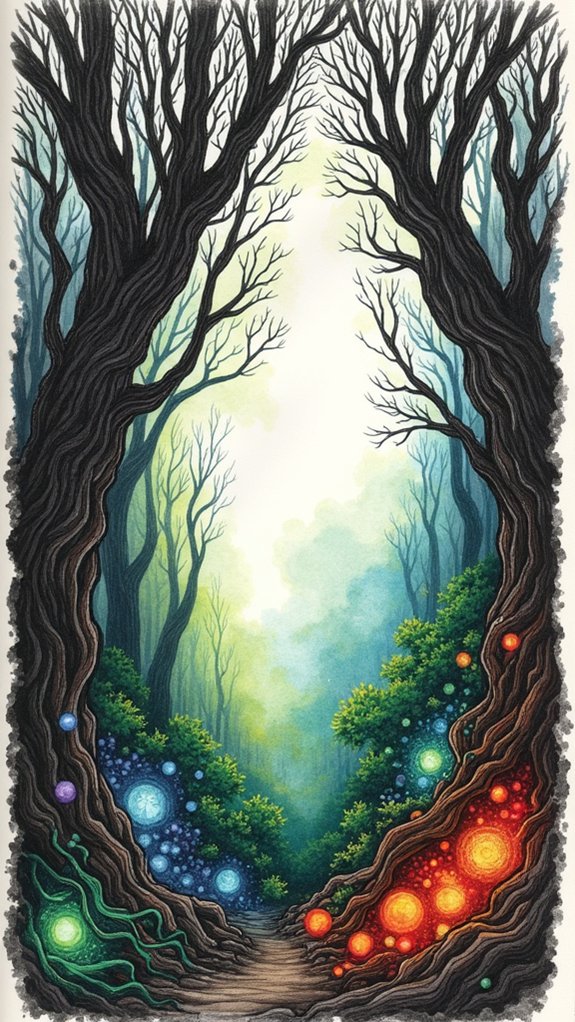
Mystical forest scenes in monochrome ink have a way of pulling you right into their shadowy secrets, where every twisted branch and swirling mist feels extra dramatic.
Then, with a single splash of bright color—a neon mushroom or glowing firefly—the whole forest scene just pops, grabbing your attention like a magic trick.
It’s almost like the forest has a secret it’s winking at you to discover, but only if you know where to look.
Exploring Monochrome Mystique
Ever wondered what happens when you mix spooky forests with just one color of ink? It turns out, monochrome ink can give any forest drawing a magical, mysterious vibe.
By sticking to a single shade, artists reveal a sense of depth and texture that makes tree trunks twistier, shadows creepier, and wildlife pop out in all the right places.
Combining monochrome ink with clever watercolor techniques? That’s where real magic happens—smooth gradients, misty atmospheres, and dramatic contrasts steal the show.
- Use cross-hatching and stippling to create wild texture in bark and leaves.
- Play with ink density—light washes feel peaceful, dark strokes ooze mystery.
- Capture details with fine nib pens for intricate mosses or roots.
- Blend watery ink for ethereal mist or fog effects.
- Challenge yourself to tell a story using only one bold color!
Highlighting With Vibrant Accents
Once artists have mastered the moody power of monochrome forests, it’s time to throw in a whole new level of awesome—by adding shockingly bold accents of color.
With mystical forest scenes drawn in monochrome ink, every shadow and twisted root stands out in dramatic, moody harmony. But imagine spotting a splash of super vibrant accent colors—like a neon frog, sparkling mushrooms, or flowers glowing against the inky darkness!
Tiny color bursts instantly draw your eye, creating mysterious focal points and turning the forest into a magical playground. Layering ink washes with colored pencil or watercolor adds yummy texture, making the whole scene shimmer with an ethereal quality.
And don’t forget: leaving some areas blank lets those bold colors really POP—like magic showing off in a dark room!
Illustrated Quotes Framed by Watercolor Splatters
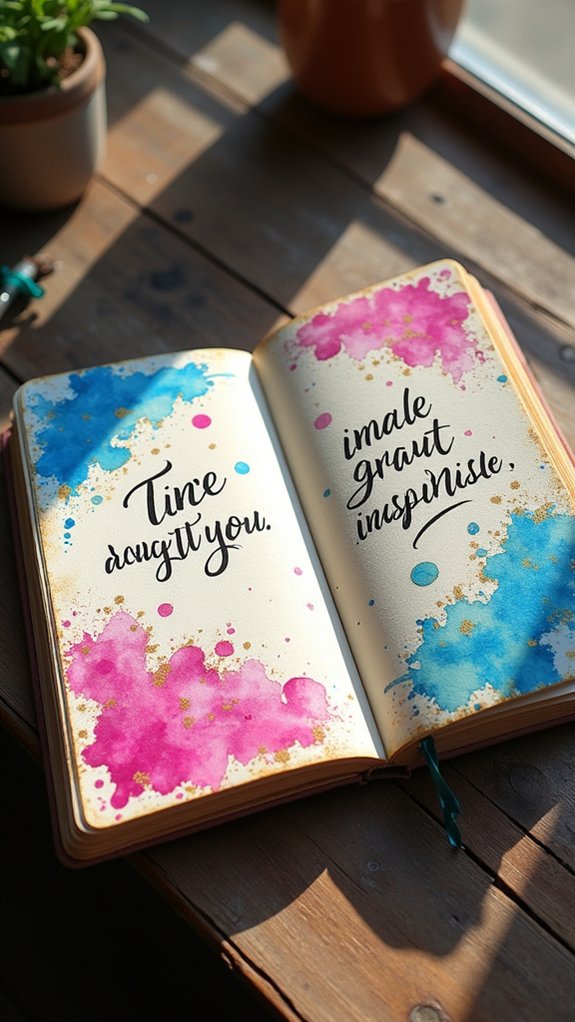
A splash of watercolor can turn a simple quote into something unforgettable. When artists use illustrated quotes surrounded by bold watercolor splatters, the words seem to leap right off the sketchbook page.
These vibrant bursts of color don’t just make things look cool—they add excitement and help tell the story behind the quote. Plus, mixing in other materials takes things to the next level.
To get the most out of this style, consider these tips:
- Plan out the placement of both the quote and splatters for maximum impact.
- Pick color palettes that match the mood of the words.
- Don’t be afraid to experiment with wild, fluid watercolor splatters.
- Use mixed media elements for texture—try ink lines or simple collage bits.
- Keep the text readable by controlling the wildness of your colors.
Underwater Worlds With Flowing Watercolor and Sharp Ink
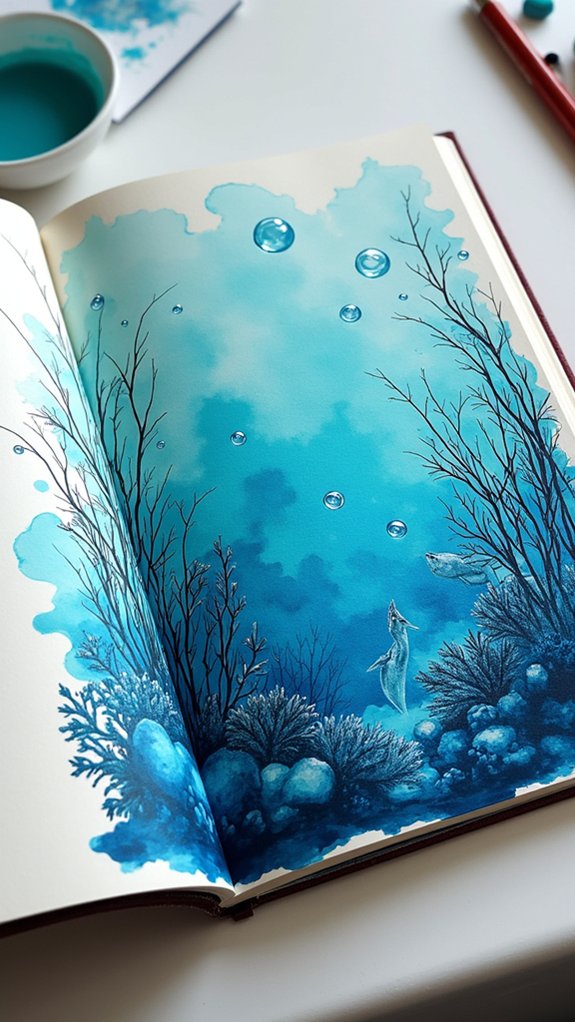
Artists looking for fresh sketchbook ideas don’t have to stop at colorful quotes—there’s a whole world lurking under the surface, just waiting to be explored.
Mixing watercolor and sharp ink lines can turn an ordinary underwater scene into true mixed-media magic. Fluid watercolor washes capture the dreamy movement of water, while bold ink outlines lock in crisp detail—think wandering jellyfish or a sneaky octopus.
Water-soluble pencils add even more control, helping blend watery blues and seaweed greens right up to those slick ink shapes. Try spattering paint or using textured brush strokes for the feeling of water splashing or swirling all around.
Even the paper matters—watercolor or mixed media paper will change how paints and inks flow, adding awesome surprises to any underwater adventure!
Minimalist Faces With Expressive Marker Patterns
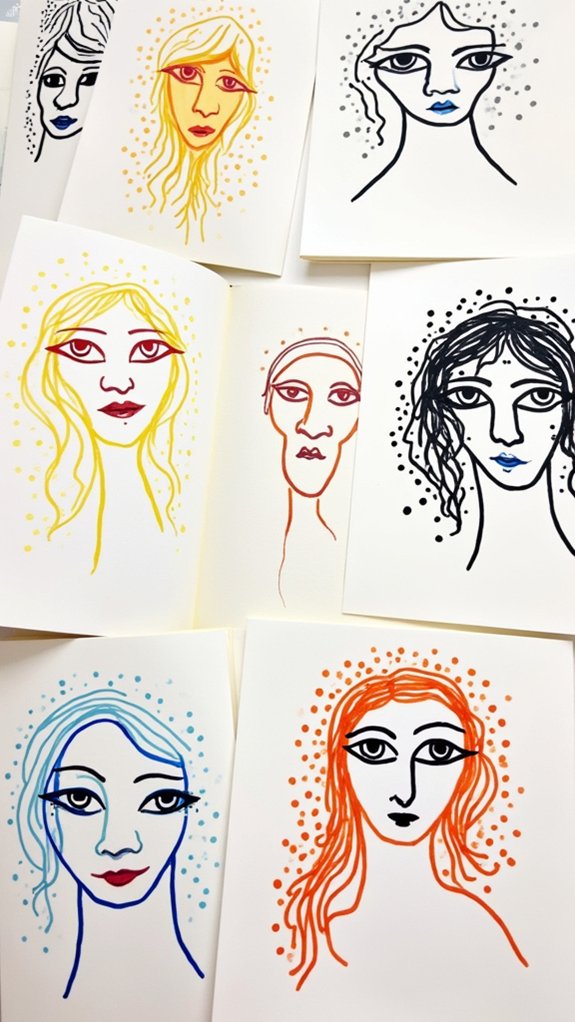
Even with just a few well-placed lines, minimalist faces can tell an incredible story—sometimes, less really is more!
Artists love how simple line art can create faces bursting with personality. But the real mixed media magic happens when you pair these minimalist faces with wild, expressive marker patterns.
Want to make your sketchbook pages pop? Try mixing it up:
- Use bold, graphic marker patterns around faces for instant drama.
- Play with cross-hatching or stippling using markers for fun textures.
- Keep your colors limited—this helps stick to a clean, minimalist look!
- Try adding soft watercolor washes as a background before outlining your face.
- Layer contrasting marker marks to draw the eye right to the expression.
This combo of minimalist faces and lively marker patterns really grabs attention, proving that simple doesn’t have to mean boring!
Vintage Objects Detailed in Sepia Ink and Cool Blues
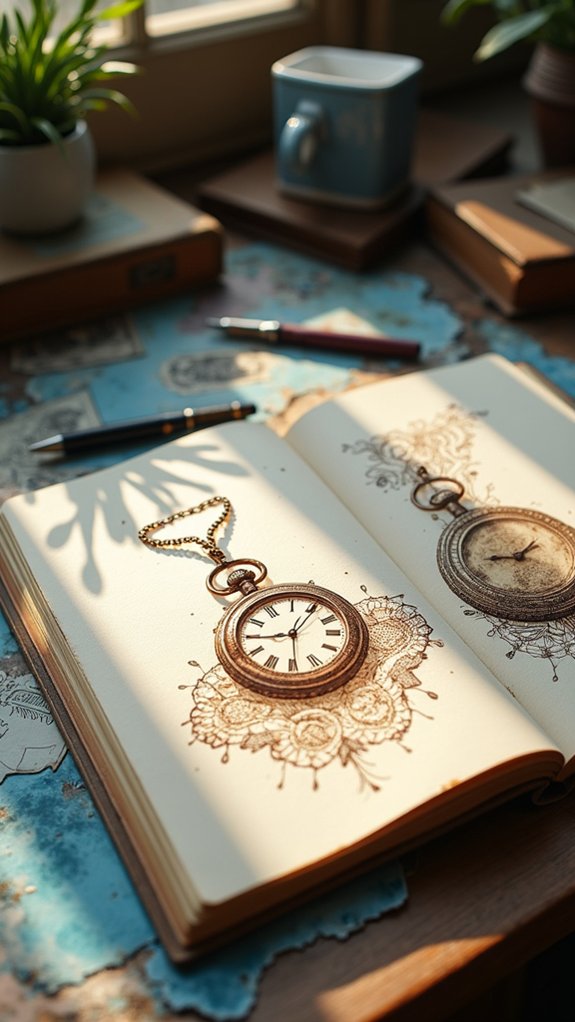
Old cameras, typewriters, and other vintage treasures really shine when drawn in sepia ink, instantly giving off those time-travel vibes. There’s just something about vintage objects outlined in that rich brown that feels like stepping back into history—maybe even before smartphones existed, gasp!
By adding cool blue tones, artists can make those sepia lines pop even more, creating awesome contrast that grabs attention and keeps eyes wandering over every little detail.
Want more magic? Try layering blue washes on top of the sepia drawings; it adds mysterious shadows and surprising depth, making everything look extra-real.
Using textured paper makes the sepia ink and cool blue tones dance across the surface. Plus, throwing in bits of old newspaper or handwritten notes makes the whole piece even cooler!
Dynamic Still Life With Mixed Media Texture
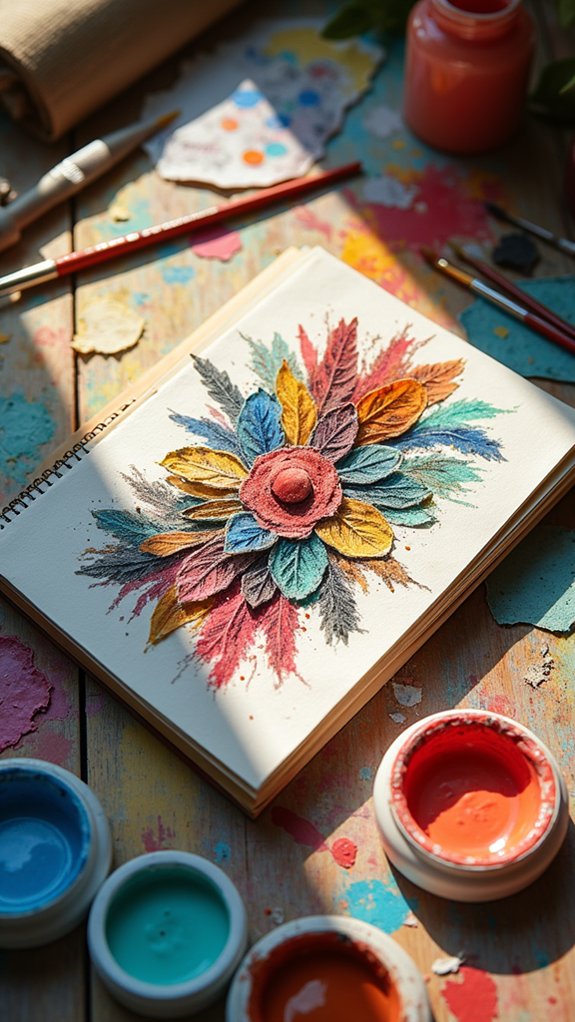
When it comes to jazzing up a classic still life, nothing brings the wow-factor like mixing in all sorts of surprising materials—think streaks of thick acrylic paint, pieces of crinkled tissue paper, or even random ticket stubs from last year’s concert.
Experimenting with a mixed-media composition lets artists amp up texture and energy, totally shaking off the “boring bowl of apples” vibes. Layering on mediums, playing with gesso, or even tossing in some bold, contrasting colors makes each piece pop with dimension and personality.
Plus, sketching from real life keeps things grounded but fresh, letting personal style peek through in unexpected ways.
Try these fun ideas for your sketchbook:
- Mix textured papers and paint
- Add found objects or ephemera
- Layer collage for depth
- Experiment with contrasting colors
- Sketch from real-life setups
Fantastical Creatures Rendered in Watercolor and Fineliner
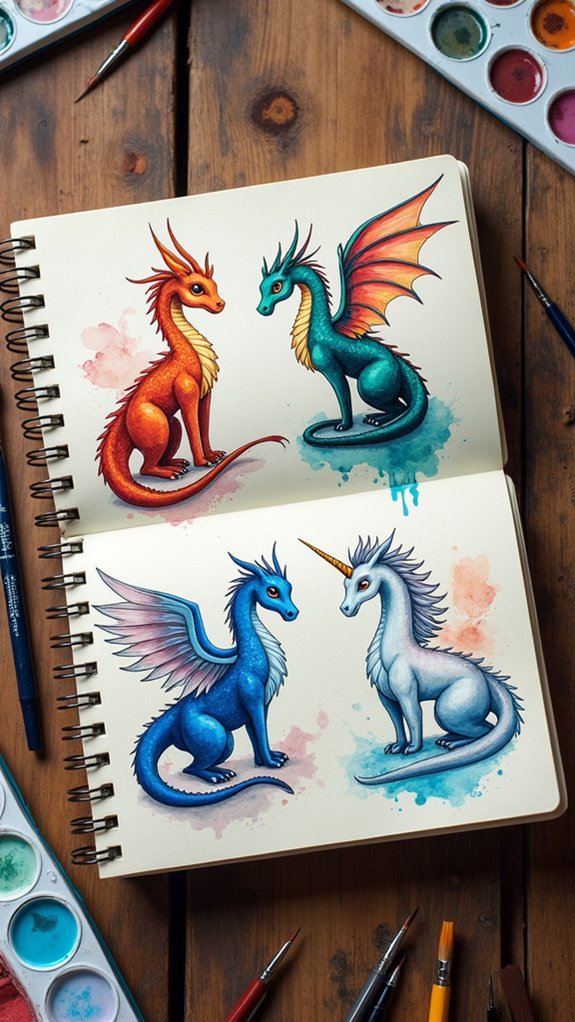
Ever wondered what it would look like if dragons, unicorns, or totally made-up monsters leaped right off the page? With watercolor and fineliner pens, anyone can summon those fantastical creatures to life in a sketchbook.
Watercolor is perfect for soft, shimmery scales, feathery wings, or glowing eyes—its flowing colors make things look seriously magical. Fineliner pens bring the crisp details, outlining curled horns, scales, or even the tiniest secret smile.
Layering watercolor washes adds dimension, so mythical beasts look truly three-dimensional. Mixing wet-on-wet with wet-on-dry techniques helps create wild textures—think fuzzy tails or misty breath.
For extra magic, adding a touch of glitter or metallic paint turns any creature into pure sketchbook gold. Who knew fantasy could be this fun?
Everyday Objects With Abstract Watercolor Backgrounds
Picture a fork or a set of headphones sitting right in the middle of dreamy watercolor swirls—suddenly, those boring objects start to feel like something out of a story.
By layering bold or soft colors behind each shape, artists can push the ordinary to the front, making it pop with contrast and energy.
When a simple mug is highlighted with gentle washes and wild, abstract backgrounds, it looks less like breakfast and more like magic—seriously, who knew homework supplies could be this dramatic?
Mundane Objects, Dreamy Swirls
Although a plain old mug or a pair of sneakers might seem pretty boring at first, mixing them with dreamy watercolor swirls can totally flip the script and turn them into something magical.
Mundane objects get a chance to shine when surrounded by abstract, colorful backgrounds. By using watercolors, artists can play with softness and color that make everyday stuff pop right off the page. Plus, layering techniques allow for lots of creative choices—try painting the object first or starting with the background for a different vibe each time.
- Pick a familiar object, like keys or a pencil, and sketch it out.
- Splash your page with dreamy watercolor swirls behind the object.
- Try both background-first and object-first layering techniques.
- Use harmonious or contrasting colors for different moods.
- Add pen details or collage for extra texture.
Layering Color for Contrast
Swapping the focus from swirling backgrounds to the way colors get stacked and layered, artists quickly find that contrast is where the real magic happens.
Layering color is a total game-changer, especially when painting everyday objects on top of splashy, abstract watercolor backgrounds. Use a limited color palette so things don’t get totally wild—this keeps the background loud but the objects in focus.
Playing with textures, like splattering paint or dabbing with a sponge, adds even more drama and makes the ordinary seem extraordinary. It’s like your apple or sneaker suddenly has its own spotlight!
Experimenting with how much water gets added changes the whole vibe—some spots turn out soft and dreamy, while others go bold.
Throw in a touch of ink or collage, and instant sketchbook magic happens.
Highlighting Form Through Washes
A simple mug splashed across a watercolor page can suddenly feel like the star of the show when washes of color swirl behind it.
Everyday objects totally pop when highlighted by abstract watercolor backgrounds; the contrast literally pulls your eye straight to the form. Layering washes isn’t just about pretty colors—it’s how you make the background dance, and the mug look like it’s ready for its close-up.
Mixing in different techniques, like splattering paint or using water to lift off color, can create wild textures that keep things interesting.
Check these out:
- Use wet-on-wet for soft, dreamy blends behind objects.
- Add layered washes for deeper, richer backgrounds.
- Splatter or lift color to give your background exciting textures.
- Paint text or patterns for extra story and context.
- Try different brush sizes to play with background shapes.
Playful Food Illustrations Layered With Brush Pen
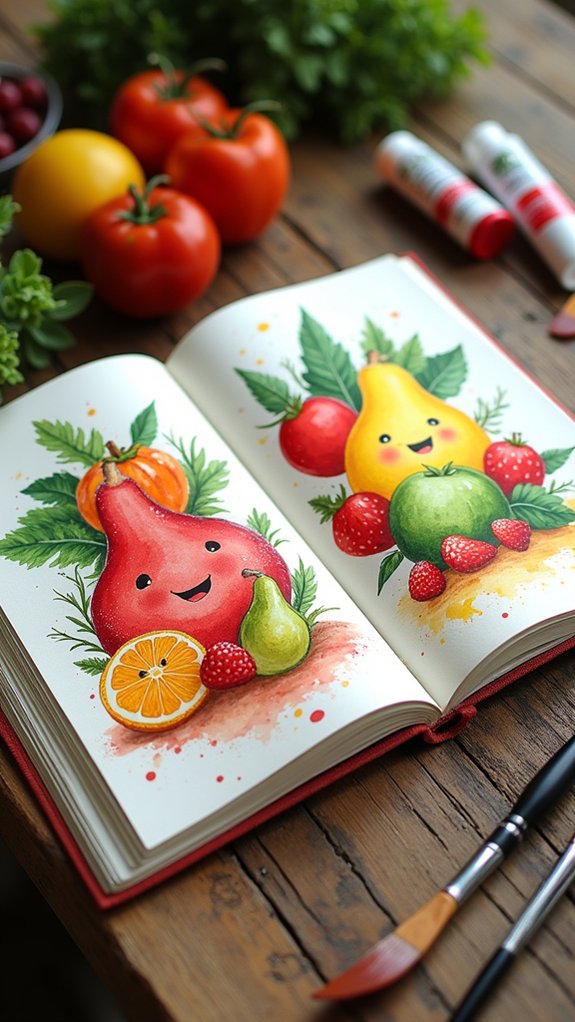
Bright splashes of color and quirky shapes make playful food illustrations with brush pens an adventure for any sketchbook.
Picture slices of pizza grinning at you or an avocado with sunglasses—this is where brush pens shine! Artists start with simple shapes, then layer on bold, vibrant colors to bring every snack to life.
Because brush pens come with different nibs, creators can make thick, juicy lines for a watermelon slice or use thin, detailed strokes for sprinkles on a donut.
Adding a mixed-media approach takes things to a new level, maybe dropping in a watercolor background or pasting paper napkin bits for texture.
Wild ideas—like giving a cupcake a pet dog—make these playful food illustrations even more imaginative and full of personality.
Nature-Inspired Mandalas Blended With Wash and Marker
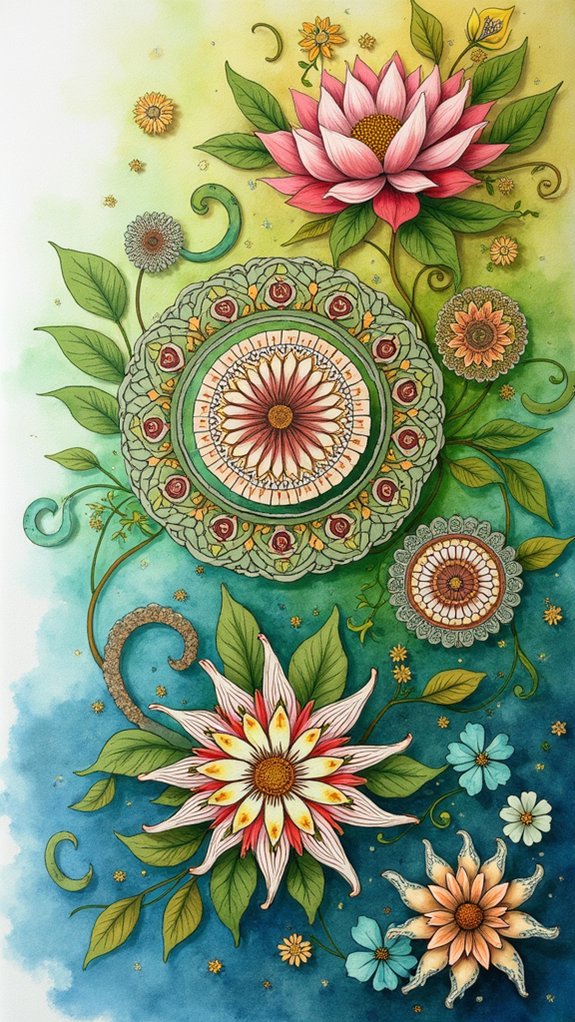
Sometimes, all it takes is a little inspiration from nature to spark some seriously cool mandala art. Nature-inspired mandalas are a fun way to mix organic shapes—think leaves, petals, and shells—into your sketchbook for a look that feels both wild and magical.
Start with dreamy watercolor washes as your background. The colors swirl and blend, so it almost feels like your design is floating! Next, grab your markers and outline your favorite natural patterns. Layering techniques totally bring this style to life, adding depth and dimension. Don’t be afraid to try different marker tips for new textures.
- Gather nature references, like flowers or feathers
- Splash down a loose watercolor wash
- Draw a mandala using organic shapes
- Outline with fine tip markers
- Add layers for extra wow-factor
Fashion Silhouettes Enhanced by Watercolor Drips
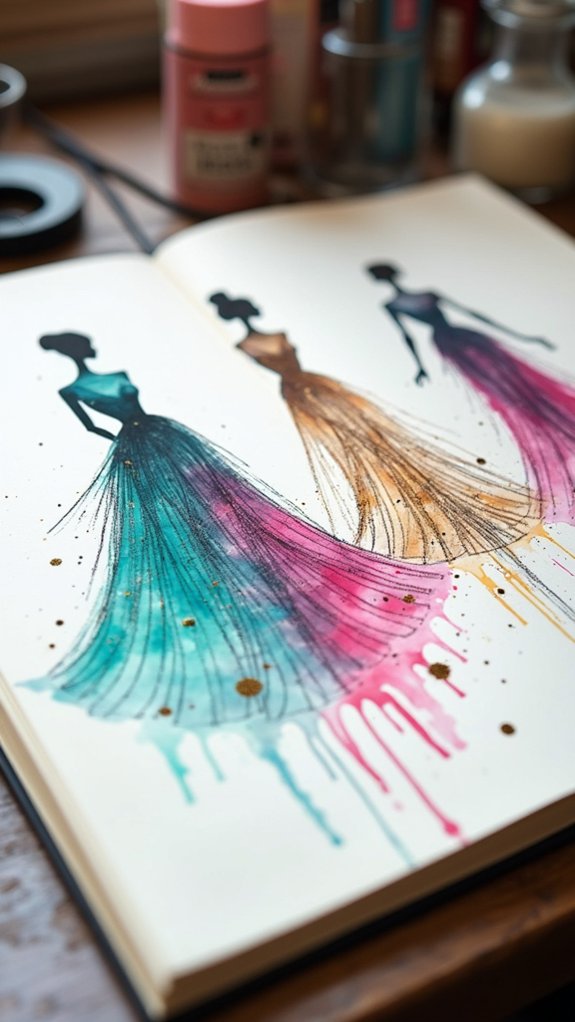
One seriously awesome way to level up any sketchbook is by combining fashion silhouettes with watercolor drips—think runway meets a rainstorm.
Just imagine: sharp, stylish outlines of figures, then bold splashes of color that flow and drip like fancy fabric in motion. That’s where mixed-media artwork really shines!
Artists use a wet-on-wet watercolor technique for those dreamy, soft edges and color blends, making each silhouette pop with grace—or a little drama, if they’re feeling wild.
Want more drama? Totally go for contrasting colors in those watercolor drips. The see-through layers from the watercolor add crazy cool texture, too.
The best part? There’s this awesome push-and-pull between keeping the silhouettes neat and letting the color go wild. Complete magic!
Windows and Doors: Ink Details With Marker Color Blocks
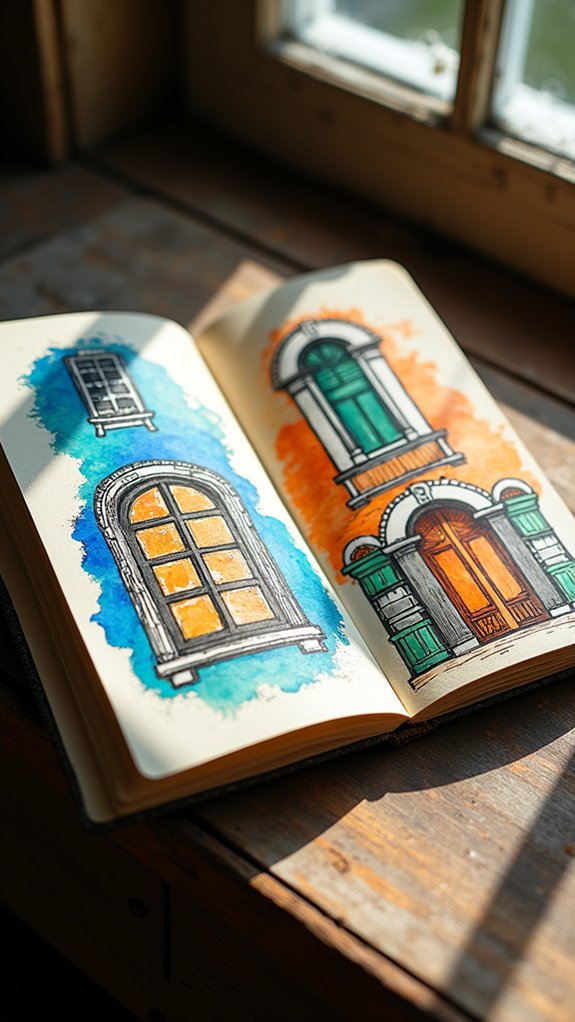
After all that wild fashion energy, there’s something seriously cool about tackling the crisp shapes of windows and doors next. Ink details give those frames and hinges real personality, especially when everything is built up with clean, careful lines.
Here’s where mixed-media magic truly kicks in—throw down bold marker color blocks to turn each window or door into a mini masterpiece. Want to level up? Try layering, mixing in textures, or even sneaking some funny doodles in the corners. Suddenly, you’ve got a page with tons of energy and story.
- Sketch window and door outlines with a fine ink pen for sharp details.
- Fill in with vibrant marker color blocks for big contrast.
- Layer markers to add depth.
- Add interesting patterns or textures.
- Include doodles or text for extra fun.
Cosmic Sketches With Galaxy Watercolor Techniques
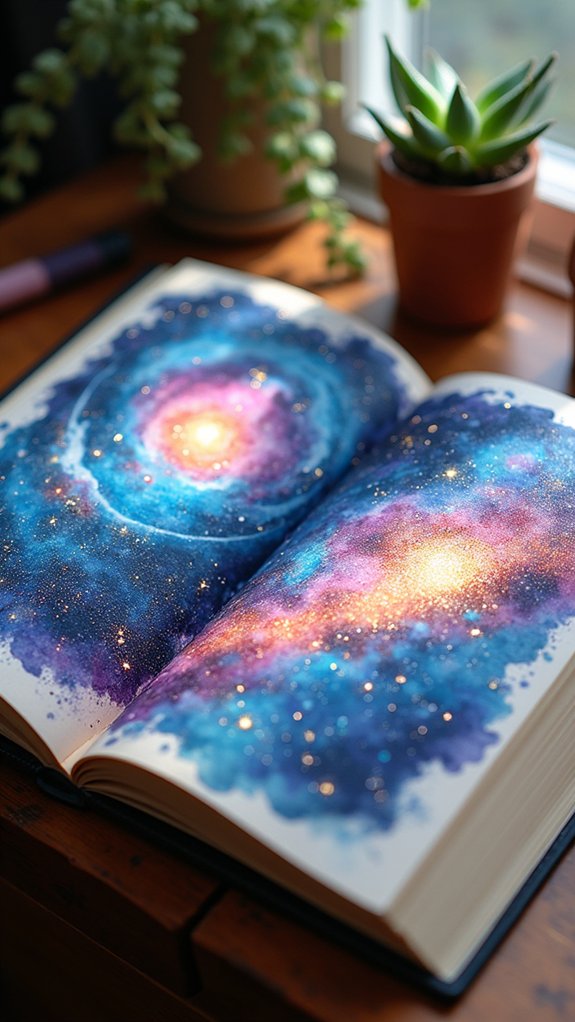
Every sketchbook artist knows that galaxy watercolor art is basically the VIP pass to having a totally magical page. Cosmic sketches come alive with galaxy watercolor techniques, turning plain paper into a vibrant universe. Starting with a gesso layer really helps those vibrant watercolor pigments pop, like the Milky Way at midnight. Using a wet-on-wet trick, mixing blues, pinks, and purples, plus some salt or plastic wrap, makes the colors blend into nebula-like textures.
Here’s a quick look at building your galaxy scene:
| Step | Tool/Material | Purpose |
|---|---|---|
| Prep Surface | Gesso | Smooths and brightens page |
| Add Water | Brush & water | Helps paint flow & blend |
| Drop Pigments | Vibrant watercolors | Create cosmic swirls |
| Stars/Highlights | Acrylic/gel pen | Add dazzling star details |
Finishing touches with white paint or gel pen create magic!
Old Book Text Overlays and Semi-Transparent Wash

Plenty of sketchbook artists know the secret thrill of pasting old book pages into their art, like they’re uncovering lost treasure with every scrap.
There’s something magical about old book text overlays—they can turn a regular page into a story-packed backdrop for all kinds of mixed-media projects. When a semi-transparent wash is added on top, it’s like giving secrets a veil. The words gently fade, peeking through, not yelling for attention but whispering hints.
- Mix watercolor or thin acrylic for a dreamy semi-transparent wash effect
- Prepare pages in advance so creative ideas don’t get interrupted
- Select unusual or dramatic book text to spark playful inspiration
- Try layering more washes for mysterious, ghosty vibes
- Make it a zero-waste project—old books, new magic!
Suddenly, even mistakes look intentional!
Animal Movement Studies in Marker, Ink, and Splash
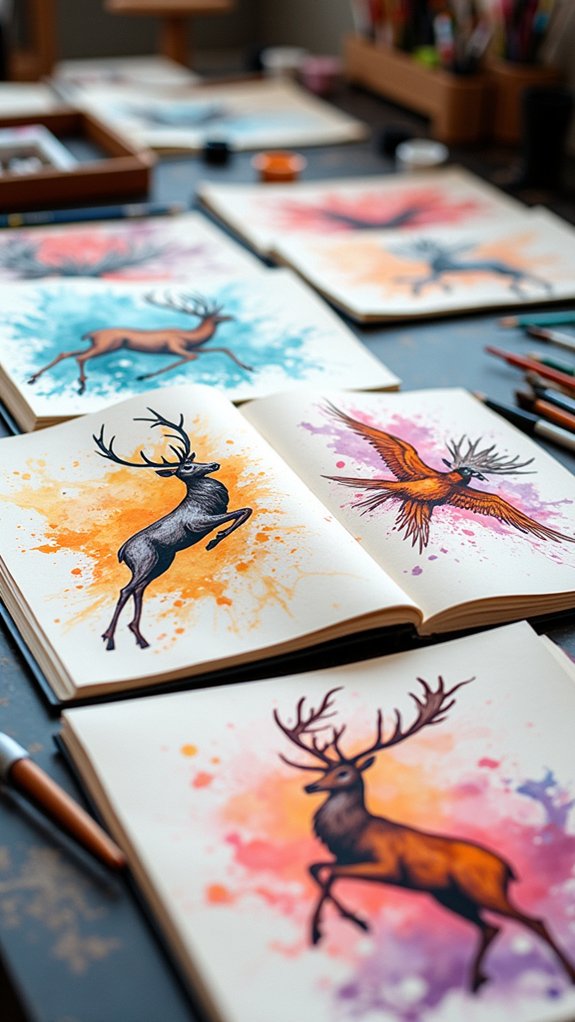
Animal Movement Studies in Marker, Ink, and Splash are all about snapping up the wild action—think pouncing cats or leaping frogs—using quick, expressive marker lines.
Splashes of watercolor and bursts of ink add a whole new level of excitement, making it look like these creatures might leap right off the page (watch those goldfish—they’re slippery!).
Mixing bold gestures with colorful splashes helps capture both the energy and chaos of animal motion, turning a simple sketchbook page into a story that almost wiggles.
Capturing Dynamic Animal Poses
Even if you’ve never drawn a moving dog or a leaping squirrel before, there’s something totally electric about trying to capture an animal in motion.
Sketching lively creatures with gesture drawing lets artists focus on the flow and energy instead of worrying about every whisker or feather—no perfection necessary! Adding splashes of color takes these studies from black-and-white to full-speed action, making a bunny hop or a bird’s wingbeat jump off the page.
To level up your sketchbook game, try these tips:
- Watch videos or visit parks to observe animals in action
- Start with quick studies—just a few minutes each!
- Use different line weights for energy and depth
- Mix in splashes of color for excitement
- Try cross-hatching and stippling for extra movement
Combining Splash With Ink
While a single swipe of vibrant color can shout excitement, pairing it with bold strokes of ink creates true magic on the page.
Splash techniques really shine when studying animal movement—imagine a cheetah’s leap suspended in a wash of wild, sizzling color. Water-soluble markers and inky splatters blend with just a flick of water, forming soft washes or shockingly bold spots that make sketches burst with energy.
These messy splashes, when layered under sharp ink outlines, let vibrant colors peek through in surprising places, adding a wild, lively feel. Watching animals run, jump, or stretch—either in videos or real life—gives clues on where to throw down the biggest splash or the quickest line.
The result? Art that almost wiggles off the page!
Expressive Marker Gesture Lines
Catch the wild energy of a cheetah’s sprint or a squirrel’s leap with nothing but a marker and a splash of color—it’s like capturing lightning in a bottle!
Expressive marker gesture lines turn shaky sketches into dynamic animal movement studies. Layering different colors makes those lines pop, creating eye-catching contrasts and showing off where the animal’s muscles tense or paws push forward.
And if things start to feel a bit too stiff, splash techniques like flicking or dripping ink bring awesome unpredictability! Quick gesture drawings keep your hand and eye in sync, while vivid splashes add an extra jolt of action.
- Capture speed by drawing fast, loose lines
- Layer colors for depth and motion
- Add splashes for exciting, abstract effects
- Sketch quickly for more natural poses
- Surround gesture lines with color bursts to show action
Frequently Asked Questions
Can You Paint in a Mixed Media Sketchbook?
The question of painting in a mixed media sketchbook involves considering sketchbook materials, such as heavy-weight paper, to support various painting techniques. This flexibility provides creative inspiration, allowing artists to experiment freely without worrying about paper warping or bleed-through.
What Is an Example of Mixed Media Painting?
An example of mixed media painting involves combining acrylic techniques for bold color, integrating collage elements such as newspaper clippings or fabric, and emphasizing texture creation through layering materials, producing a visually dynamic and tactile artwork that defies traditional boundaries.
What Is the Best Paper for Mixed Media Art?
When selecting the best paper for mixed media art, artists evaluate paper types for durability, consider texture differences such as smooth versus textured surfaces, and assess weight considerations, usually preferring heavyweight paper to support diverse media layers.
How to Make Your Sketchbook Unique?
To achieve sketchbook personalization, artists explore creative techniques such as mixed paper types, textured backgrounds, collage, and interactive features. These methods foster artistic inspiration, encourage experimentation, and transform a standard sketchbook into a truly unique visual narrative.
Conclusion
Mixed-media sketchbooks are basically a playground for creative minds. With watercolor, ink, and markers, anyone can turn a boring blank page into a total masterpiece—or at least a fun experiment! These 24 ideas offer countless ways to mix things up, get a little messy, and discover your unique style. So next time inspiration runs low, remember: a splash of color and a doodle or two can work real magic. Just grab your tools and let your imagination run wild!
Leave a Reply