
Creating festive Christmas window art with POSCA paint pens turns any glass surface into a winter wonderland. Start by cleaning your window—no one wants dust in their snowflakes! Sketch holiday designs like snowmen, stars, or Christmas trees in pencil before layering on vibrant colors. Blend shades for eye-popping effects, then add details like sparkling snowflakes or funky holly. Don’t forget a sealant if you want your masterpiece to survive holiday chaos. Curious about cool tips for adding depth and finishing touches?
Key Takeaways
- Thoroughly clean the window before starting and gather vibrant POSCA paint markers, stencils, and a clear sealant for best results.
- Plan a festive design on paper, choosing classic motifs like snowflakes, holly, or Christmas trees for visual impact from both sides.
- Lightly sketch the design onto glass with a pencil, then outline and fill in with POSCA pens, layering colors for depth and vibrancy.
- Add details and highlights using white or metallic markers, allowing each layer to dry completely before adding new elements.
- Seal the finished artwork with a light clear spray, and regularly touch up to maintain color brightness throughout the season.
Gathering Your Materials for Festive Window Art
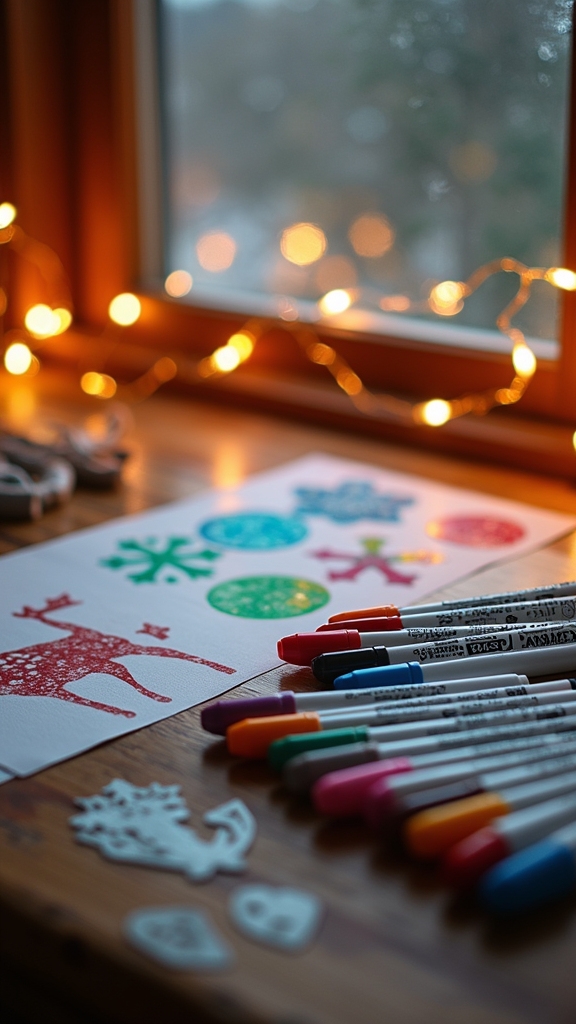
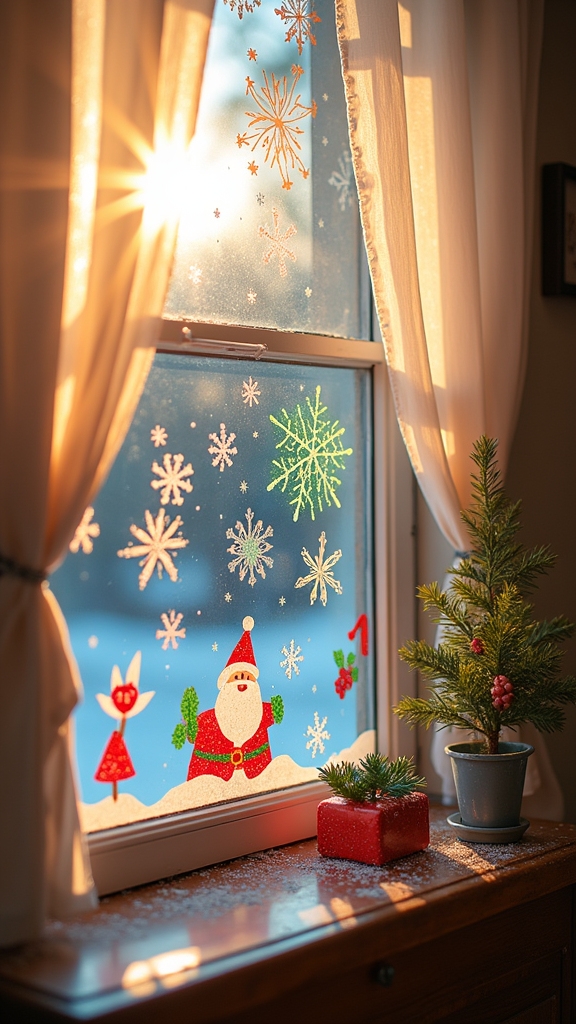
Supplies are the secret behind every awesome window art masterpiece, and gathering the right ones can feel almost as exciting as the drawing itself. For festive window magic, artists reach for POSCA products—especially the paint markers—because their bold, vibrant colors like red, green, white, and gold practically scream “holiday cheer!”
But before any doodling starts, windows need to be squeaky clean. Dust and greasy fingerprints are total party crashers for marker art, so a good wipe-down is a must.
Stencils or templates, cut from cardstock or printed out, can keep designs sharp and stress levels low. Don’t forget a damp cloth for quick fixes—mistakes happen!
And here’s a pro tip: let each colorful layer dry before adding details, for that super polished, envy-worthy finish.
Planning Your Christmas Window Design
Before any marker touches glass, the real magic begins with a solid plan.
Planning your Christmas window design is like mapping out the North Pole—exciting, a bit wild, and totally worth it. Start by picking a theme: maybe frosty snowmen, twinkling stars, or classic holiday patterns.
Don’t be afraid to hunt for inspiration—scroll through holiday cards, decorations, or the endless wonders online. Sketch your design on paper first, figuring out where each merry detail will go on the window.
Make sure to contemplate how it’ll look from inside and outside—nobody wants a backwards Santa! Gather your POSCA paint markers and double-check you have every color needed.
With a plan this strong, your window art is already halfway to festive fame.
Choosing and Blending Colors With Posca Pens

Once the design is mapped out, it’s time to release the real fun—choosing which colors will make your Christmas window shine brighter than Rudolph’s nose.
With POSCA pens, the options are almost endless, but sticking to classic holiday colors like red, green, and gold instantly brings a jolly vibe. For extra sparkle, add white or gold as highlights on top of darker shades.
Blending is a breeze—just layer different shades of POSCA pens and watch the colors mix while still popping on their own. Want your masterpiece to look pro? Pick three to five complementary colors and use them consistently, so everything feels like it belongs together.
Test out opacity by layering pens, making colors richer and your window art even more eye-catching!
Sketching Out Your Holiday Motifs
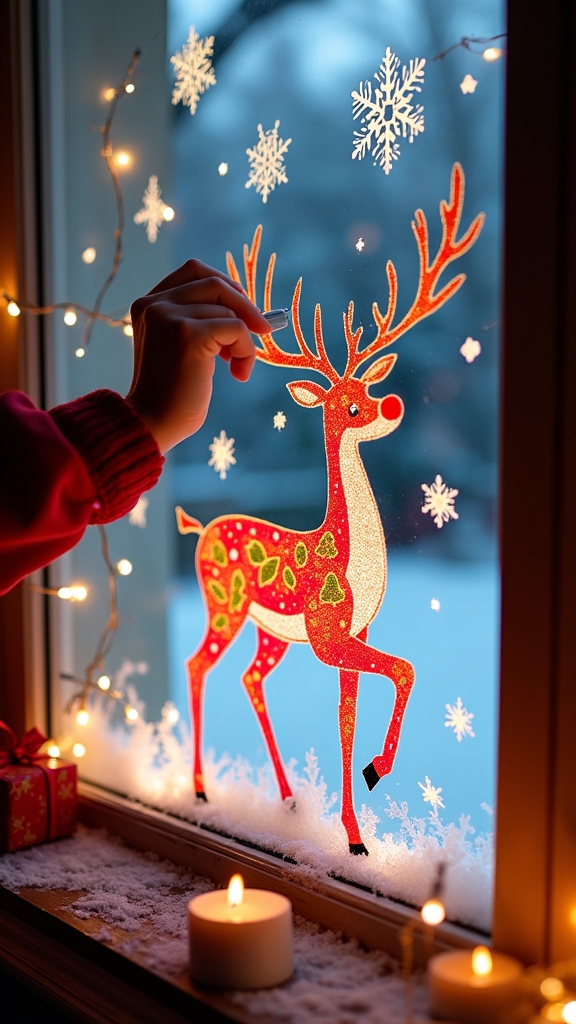
Almost everyone gets a little spark of excitement when it’s time to sketch out holiday motifs on a window—it’s like doodling, but with magic.
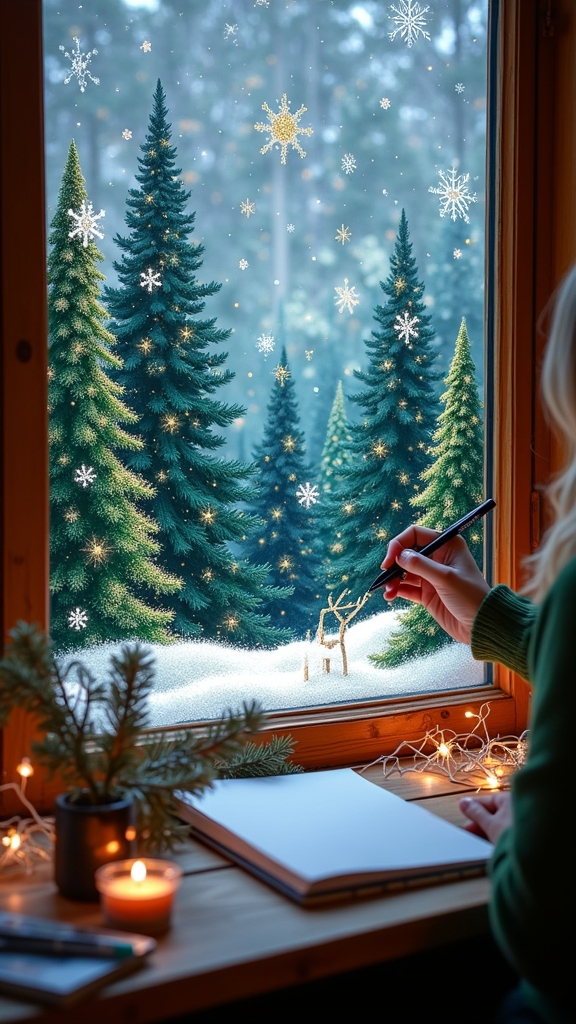
Choosing which classic designs to draw is half the fun. Maybe a jolly reindeer, a bunch of snowflakes, or the always-popular Christmas tree? Start by grabbing a pencil and lightly sketching your favorites right onto the glass.
Don’t worry about being perfect! Mix up the sizes and tilt your designs at different angles to make your window art pop. The goal is to make your art playful and full of cheer, so peek at traditional holiday symbols for inspiration.
Once your sketches look just right, grab those vibrant POSCA pens and get ready to bring your holiday vision to life.
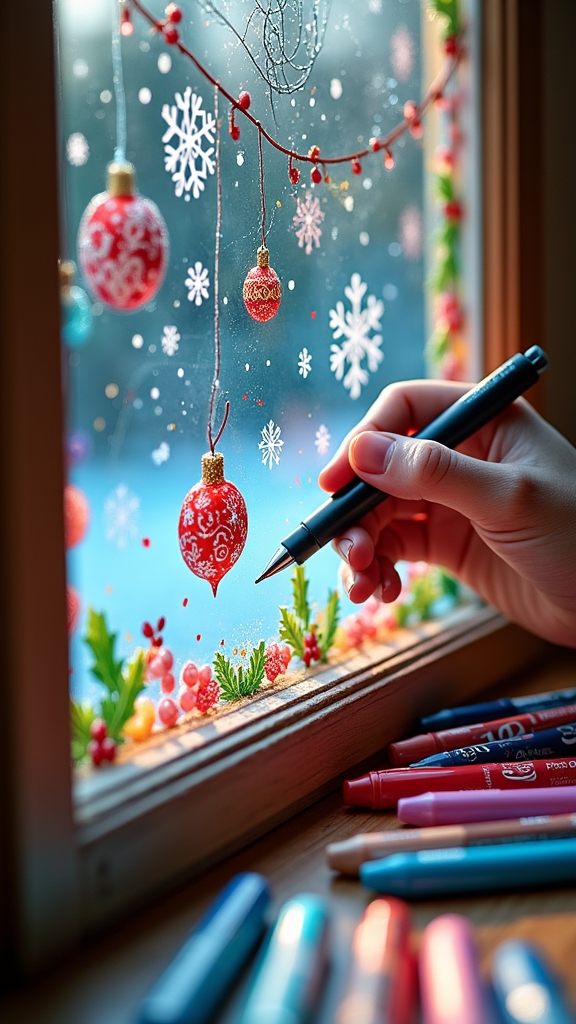
Adding Details: Snowflakes, Holly, and Christmas Trees
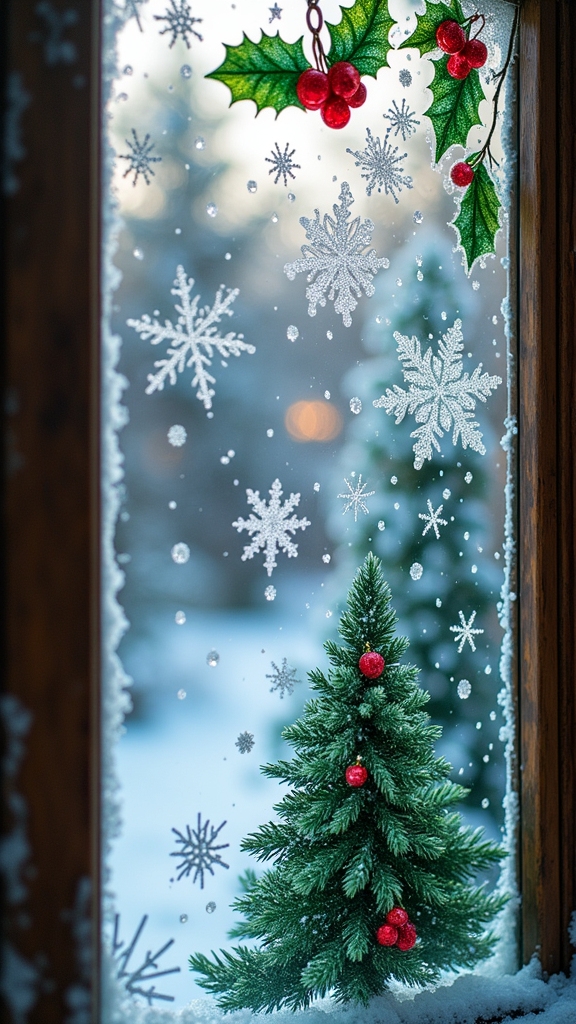
Now comes the fun part—adding those tiny touches that make your window art pop, like frosty snowflakes and cheerful holly.
Snowflakes can get super fancy with blue or violet lines, while holly and Christmas trees let you play with bold greens, bright reds, and even a sprinkle of gold if you’re feeling extra.
Whether you stick to classic shapes or get wild with hearts and loops, these details bring your whole design to life (and might make your neighbors a little jealous).
Designing Intricate Snowflakes
Even though snowflakes might seem tricky at first, designing them with POSCA paint markers is actually super fun—and way easier than trying to catch a real one on your tongue.
To spark creativity, grab some blue, violet, and gold markers and start with a large cross or a couple of diagonal lines. This basic frame gives your snowflake structure, but don’t stop there! Add little hearts, dots, loops, and dashes to the arms for extra flair.
The more small touches you include, the more your snowflake pops—almost like it’s glowing right on the glass. Try different sizes and scatter them around the window to create a magical, wintery vibe.
Each snowflake turns out unique, just like the real deal but way less chilly.
Crafting Festive Holly Trees
Plenty of holiday magic comes alive when holly trees, snowflakes, and all things Christmas get combined on a window. To kick things off, artists grab green POSCA paint markers and sketch out holly trees, using zig-zag lines to make those branches look bushy and layered—almost like a spiky green crown!
For a frosty vibe, they swipe white POSCA paint markers right over the green, adding icy highlights that shimmer like fresh snow. Around the trees, blue and violet paint markers turn plain glass into a winter wonderland, with geometric snowflakes popping up everywhere.
Of course, it wouldn’t be holly without those classic green leaves and bright red berries, drawn in different sizes for fun. A little gold paint marker sparkle? That’s the finishing touch!
Layering Techniques for Depth and Texture
Layering with POSCA pens is where the real Christmas window art magic happens—think of it as stacking up colors and textures like a festive sandwich.
By building up vibrant color layers and sneaking in some clever textural details, artists can make their snowy scenes and twinkling lights look almost three-dimensional.
It’s all about patience, some creativity, and maybe resisting the urge to poke at the paint while it dries—trust, it’s worth the wait!
Building Vibrant Colour Layers
A splash of bold color is where the real magic starts when using POSCA pens for Christmas window art.
First, artists grab their favorite shade from the full range of POSCA and lay down a smooth, even base layer, like icing on a holiday cookie—no lumps allowed!
Once dry, it’s time to amp things up by adding a second layer in a contrasting or complementary color. This trick makes the artwork pop and look super lively.
Lighter shades or white pens are perfect for highlights, making it seem like fairy lights are twinkling right on the glass.
Mixing things up with cross-hatching or stippling brings extra texture and excitement.
Finally, outlining shapes with fine-tipped pens gives every snowflake and ornament a crisp, polished look.
Adding Festive Textural Details
Once the colors are looking bold and bright, it’s time for the real fun—making every snowflake, ornament, and gingerbread house pop off the glass with festive texture.
Start by layering different shades of your POSCA pens. Lay down a base color, then add lighter or darker tones for depth, almost like magic shading.
Want your snowflakes to look frosty? Use a white POSCA pen to dab or cross-hatch over green lines—suddenly, you’ve got sparkling snow or icy frost!
Try stippling or cross-hatching with different colors to give ornaments a cool, bumpy feel. Don’t forget a dash of metallic gold or silver for that extra shimmer.
Always let each layer dry before adding more—unless you want a squishy, smeared masterpiece (which nobody wants, except maybe reindeer).
Drying and Setting Your Finished Window Artwork
Patience kicks in as the final brushstrokes dry—nobody wants a smudged Santa or a streaky snowflake after all that hard work!
When using POSCA markers on glass, it’s super important to let your masterpiece sit for at least 30 minutes. This gives the paint a chance to really stick to the window, so your holiday doodles stay crisp and bright.
Don’t poke or tap the paint while it’s drying, unless you want a fingerprint where Frosty’s nose should be! For extra staying power, a light spray of clear sealant after drying can help protect your art from accidental splashes or curious hands.
Just remember, keep your window out of harsh sunlight—too much can fade those vibrant POSCA colors before the season ends.
Inspiring Ideas for Group and Family Window Projects
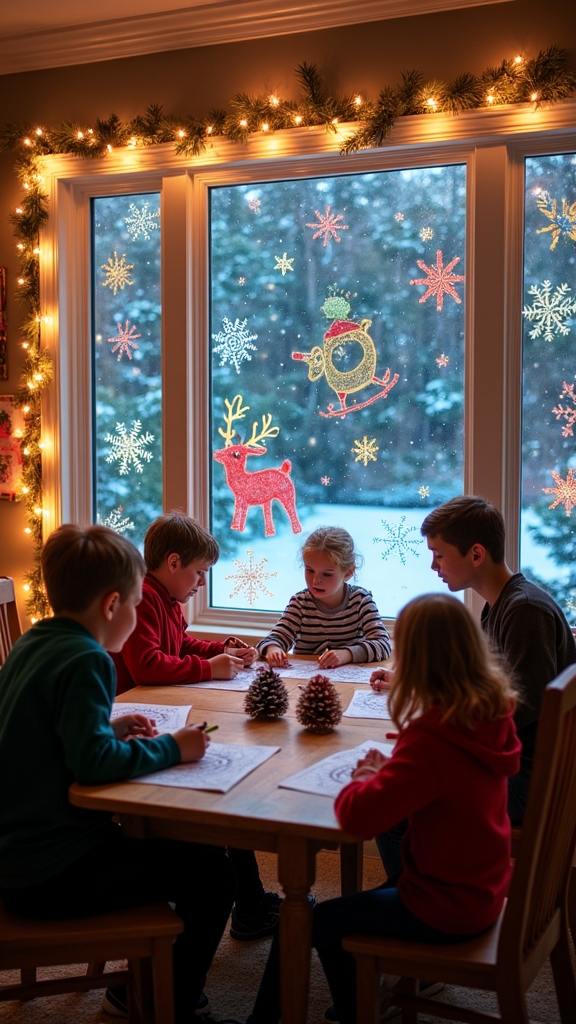
Nothing brings people together quite like a big, blank window just waiting to be turned into a holiday masterpiece.
Group and family window projects with vibrant 3M POSCA pens aren’t just about decorating—they’re about making memories and showing off everyone’s creativity. Make sure everyone gets a turn to add their own spin to the scene.
Think about mixing up colors and styles, so the end result is totally unique. Here are some inspiring ideas to kick things off:
- Sketch a giant winter wonderland with snowflakes, trees, and holly berries—each person adds their favorite piece.
- Plan your layout together on paper first, then bring it to life on the window.
- Use bright colors so sunlight makes everything pop.
- Make sure to snap group photos with your finished masterpiece!
Frequently Asked Questions
How Do You Make a Window Look Christmassy?
To make a window look Christmassy, one can incorporate holiday themes like Christmas trees, snowflakes, and baubles using vibrant colors. Adding layered textures, varying line thickness, and detailed motifs such as holly leaves enhances the festive atmosphere.
What Paint to Use for Christmas Window Painting?
For Christmas window painting, 3M POSCA paint markers are recommended due to their vibrant color selection and suitability for glass. Their water-based formula makes removal easy, while varying tip sizes allow both bold outlines and detailed, festive designs.
How to Do Window Art Step by Step?
When exploring window art step by step, one starts by cleaning the surface, sketching a design, and applying color with careful art techniques. Layering, drying between applications, and adding details guarantee a vibrant, finished artwork.
What Is the Best Paint for Temporary Window Painting?
When considering Paint Types for temporary window painting, water-based, non-toxic paints such as POSCA paint markers or products labeled as “window paint” are ideal. These options are easily removable and safe for glass surfaces, ensuring convenient cleanup.
Conclusion
And there you have it—your windows are now bursting with Christmas magic, thanks to your awesome Posca pen skills! Whether you drew snowflakes, trees, or a flying reindeer (nice touch, by the way), your creativity just transformed plain glass into holiday cheer. Don’t be surprised if neighbors stop to admire your art—or maybe even ask for your autograph. So grab your pens, crank up the holiday tunes, and let your window become the brightest part of the block!
Leave a Reply