
Drawing pencil art flowers step-by-step is easier than it looks—first, grab a reference photo (yes, even the pros use them!) and sketch light circles or ovals for flower heads, adding triangles for leaves. Gently draw curvy petals, sprinkle in veiny leaves, and don’t be afraid to erase mistakes—mistakes are just extra practice. Add some oomph with shading; try hatching and crosshatching for drama. Finish with sharp lines or even a pop of color, and if you’re curious what’s next, things are about to get even more interesting!
Key Takeaways
- Start by selecting a flower reference photo and create a light grid on your paper for accurate proportions.
- Sketch basic shapes like circles and ovals to outline flower heads, petals, and leaves.
- Lightly refine the outlines, focusing on natural curves and adding veins to the leaves for realism.
- Add shading using hatching and crosshatching techniques, adjusting pencil pressure for depth and texture.
- Finalize your drawing by erasing guidelines, enhancing lines, and optionally adding subtle color accents.
Choosing References and Planning Your Composition

How do artists make their pencil art flowers look so amazing, anyway? A big secret is choosing references that are both beautiful and free to use—sites like Pixabay, Unsplash, or Pexels are lifesavers here. No lawsuits, just lovely blooms!
Once a favorite image is found, artists often create a grid on their paper to match the reference. This helps keep everything in the right spot and in perfect proportion, so nobody ends up with a wonky tulip. Identifying the midpoint of the reference makes it easier to position every petal and leaf just right.
Don’t forget the rule of thirds! By planning composition and placing main flowers along grid lines, artists add extra “wow” factor before they even draw a single line.
Sketching Basic Shapes and Outlines
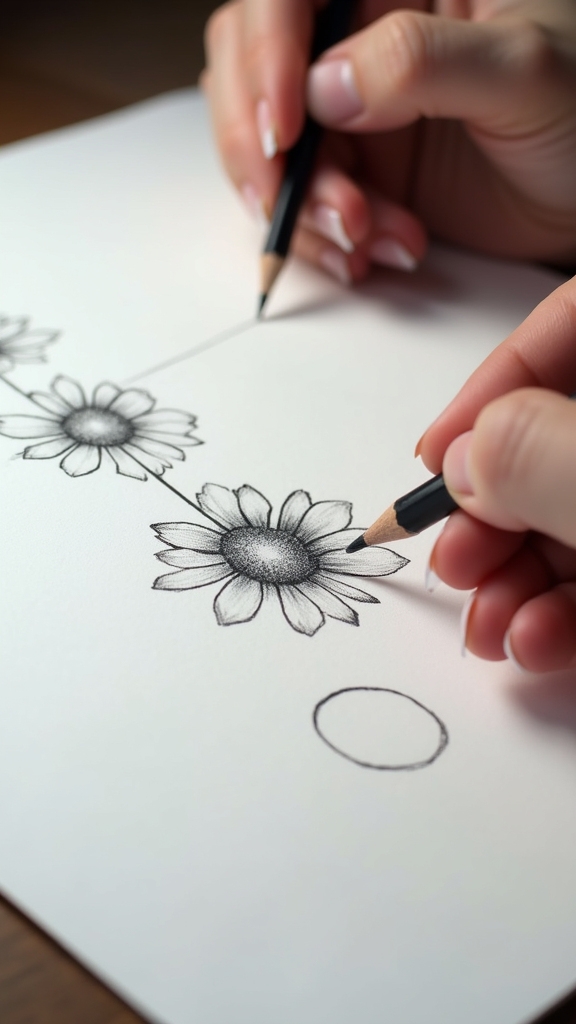
With a reference image and a solid plan in place, it’s finally time to put pencil to paper.
Start by sketching basic shapes—think circles for flower heads, ovals for petals, and triangles for leaves. Don’t press too hard; keep your outlines super light and wispy so you can easily erase any “Oops!” moments without a trace.
Use guidelines to place each petal and leaf in the right spot—flowers can get wild if you’re not careful with their symmetry! Take a step back every once in a while.
Squint at your drawing like a suspicious detective to see if everything feels balanced. If a petal looks a bit off, tweak it. Remember, getting the basic shapes right sets up everything that comes next!
Refining Petals, Leaves, and Details

Once those basic shapes are on the page, the real magic begins—now it’s time to make each petal and leaf look alive and full of character.
Refining petals is all about paying close attention to their natural curves and those sneaky little wobbles and bumps that make every flower unique. Using gentle pencil strokes, outline each petal lightly, so changes are easy if you spot something off.
Don’t be afraid to vary your line thickness! Some petal edges can be sharp, while others fade softly, just like in nature.
When working on leaves, sketch a strong center vein, then add side veins branching off for a cool, realistic look. Slow down, check your references, and let your imagination add those perfect details!
Shading Techniques for Depth and Texture
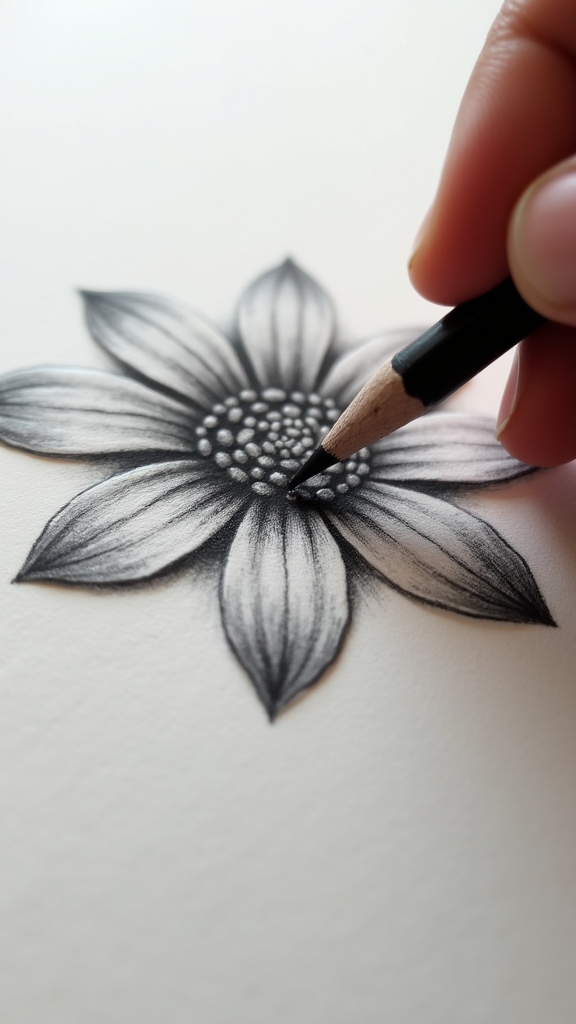
After sketching all those awesome details into each petal and leaf, the next big adventure is bringing flowers to life with shading.
Shading techniques are like a magic trick for your pencil art—suddenly, your flat drawing looks real enough to sniff! Start with hatching for lighter areas by drawing lines close together and play around with how many you use.
Feeling wild? Try crosshatching by layering lines in different directions for powerful shadows and depth. Change your pencil pressure: lighter touch gives a gentle shade, while pressing harder brings drama.
Got a blending stump (or just your finger)? Smudge the pencil to create smooth, soft gradients—flowers love that glow!
Always remember where the light hits; shadows hide on the opposite side for realism.
Finalizing and Enhancing Your Flower Drawing

Although the heavy lifting is done and the flower looks nearly finished, it’s time to kick things up a notch and really make that drawing pop! Here’s where finalizing and enhancing transform a good drawing into a really awesome one.
First, gently erase those leftover pencil guidelines after the ink is totally dry—no one wants stray lines cramping their flower’s style!
Next, use finer liners with different line weights to bring out the foreground petals and add cool contrast. Try hatching and crosshatching; it’s like giving your flower dramatic lighting for a stage performance.
If you’re feeling extra bold, sneak in some color with pencils or markers for extra flair.
Finally, snap a high-quality pic to show off your masterpiece to friends or family!
- Erase extra pencil guidelines
- Use varied line thicknesses
- Add hatching and crosshatching
- Apply subtle color accents
Frequently Asked Questions
How to Draw Flowers With Pencil Step by Step Easy?
The current question addresses simple pencil methods for drawing flowers. Flower Techniques involve outlining shapes with light strokes, refining petal details, using hatching for depth, considering perspective for realism, and cleaning up lines for a finished effect.
How to Draw a Flower in 5 Minutes?
To answer how to draw a flower in 5 minutes, Flower Sketching starts with basic shapes. Quick lines define petals and leaves, light shading adds depth, and bold outlines finalize details, efficiently capturing the flower’s form.
How Do You Draw Cute Flowers for Beginners?
When exploring Flower Styles for beginners, one should start with basic shapes and simple lines to create petals. Adding playful details and experimenting with various leaf forms allows beginners to achieve charming, visually appealing, and cute flower drawings.
How Do You Draw a Beautiful Rose With a Pencil?
To render a beautiful rose with a pencil, one should use foundational rose techniques: sketching basic shapes for structure, layering petals with curved lines, refining with shading and hatching, then finishing with flowing leaves and dimensional shadows.
Conclusion
Drawing pencil art flowers isn’t just about lines—it’s about capturing life, even if your flower looks more like a potato at first. With practice, anyone can turn wobbly petals into something jaw-dropping. Remember, don’t stress if you smudge a leaf or invent a new species by accident. Every mark helps you improve. So grab that pencil, trust your eye, embrace a few mistakes, and let your flowers bloom right off the page—potatoes and all!
Leave a Reply