
Looking for a way to calm down and have some doodle fun? Check out these 12 Zentangle patterns: Crescent Moon has swirling crescents for confidence, while Hollibaugh is a maze of lines with cool shading. Printemps spirals like playful springs, Paradox Triangle twists into optical illusions, and Zigzag Waves bounce with energy. Try L-Shaped Repeats, Chessboard Boxes, Connected Dots, and even a Mountain Scenery Zentangle for creative kicks. If you’re curious what the rest are, stick around for more inspiration!
Key Takeaways
- Explore curved patterns like Crescent Moon and Printemps for simple, flowing doodles that quickly induce relaxation.
- Try geometric designs such as Paradox Triangle and Zigzag Waves to create visually satisfying, mindful line work.
- Use structured patterns like Hollibaugh and Chessboard Boxes to enjoy organized, repetitive drawing that eases stress.
- Experiment with playful designs like Connected Dots to encourage creativity and spontaneous relaxation.
- Enhance your Zentangle art with shading techniques for added depth, dimension, and a more immersive calming experience.
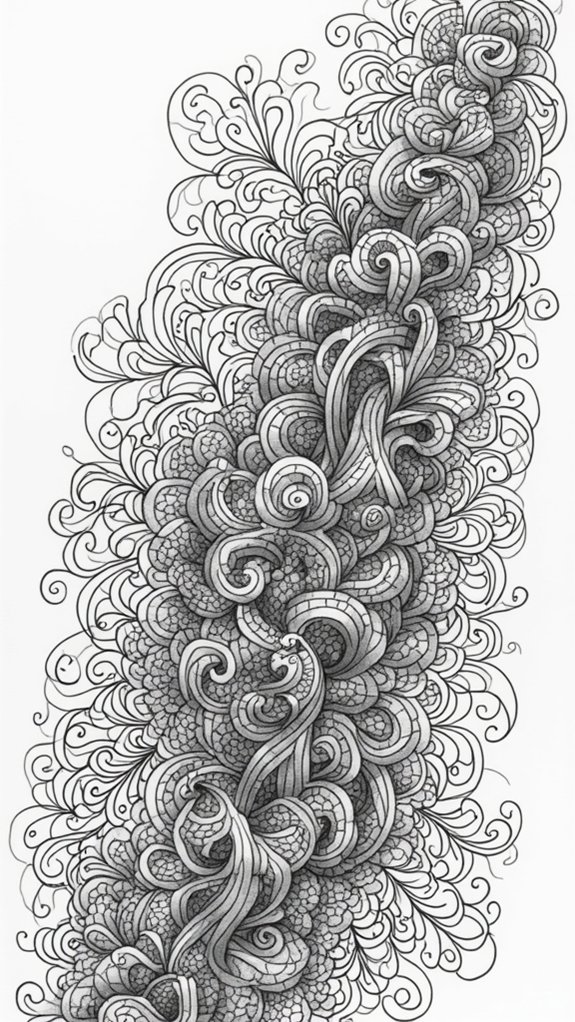
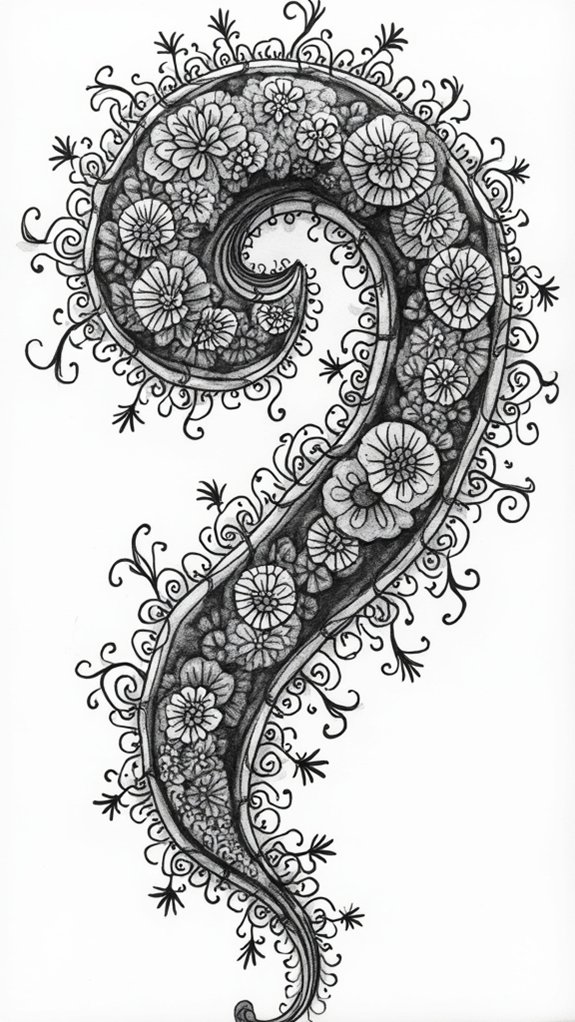
Crescent Moon

Out of all the zentangle patterns out there, Crescent Moon might just be one of the coolest to start with. This pattern looks way more complicated than it actually is, which totally boosts confidence.
Using a Micron pen, anyone can draw a bunch of crescent shapes that connect and swirl like waves or maybe even funky macaroni noodles. Varying the size and direction of the crescents makes the design pop, kind of like a starry sky with a twist.
To take things up a notch, artists often use colored pencils to shade and highlight parts, giving the shapes a smooth, three-dimensional vibe. Crescent Moon zentangle patterns aren’t just relaxing—they make anyone’s art look skilled, balanced, and surprisingly professional right away!
Hollibaugh
A maze of lines and angles, Hollibaugh has a way of making any Zentangle piece look like it’s packed with secret passages and hidden doorways.
The magic of the hollibaugh pattern comes from its straight lines stacked at odd angles, as if they’re wild bridges crisscrossing a puzzle. It’s actually fairly easy to make—draw straight lines in one direction, then start weaving others over and under at all sorts of slants.
Don’t worry about making it perfect; a bit of wobble just gives it character! Add some shading to really make those lines pop, and suddenly your design looks deep enough to explore.
Hollibaugh fits inside any shape and begs for wild colors or crazy textures. It’s surprisingly fun!
Printemps

Next up is Printemps, a Zentangle pattern with a name that literally means “spring” in French, which kind of fits since it’s basically a party of spirals spinning across your page!
This quirky design started with the idea of playful, swirling shapes, and artists use lots of connected spirals in different sizes and directions to make each section pop.
With some practice (and maybe a few laughs when your first spiral looks more like a snail), anyone can master simple techniques for drawing and shading Printemps to give it that awesome three-dimensional look.
Origins of Printemps Pattern
Swirls and spirals jump right off the page when you look at the Printemps pattern, and it’s easy to see why it got its name—“printemps” actually means “spring” in French!
This unique pattern in zentangle art is all about those curly, circular shapes that make you think of new beginnings and fresh starts. Designed to help artists find relaxation, the Printemps pattern leans into that springtime vibe of renewal.
Plus, it’s super flexible—artists can experiment with different sizes or densities. Here’s what makes Printemps stand out:
- Inspired by the gentle blooms and renewal of spring
- Developed as part of Zentangle to encourage creativity
- Shapes promote a meditative, relaxing experience while doodling
- Lets artists use it as space filler or as the star of the artwork
Techniques for Creating Printemps
Grab a pen, because making the Printemps pattern feels a little like uncoiling a spring right onto the page!
It all starts with picking a good starting point—anywhere works, but the center is classic, and honestly, one of my favorite places to begin.
Imagine you’re back in elementary school, doodling on your notebook—except now, those spirals actually have a fancy name.
Draw small circles in different sizes, then use soft curves to connect them into spirals. You can change how hard you press to get thicker or thinner lines, creating a cool effect that pops off the page.
Mixing Printemps with other Zentangle patterns? Totally awesome.
The best part—besides the fun—is how your hands get better and your mind chills out!
Paradox Triangle
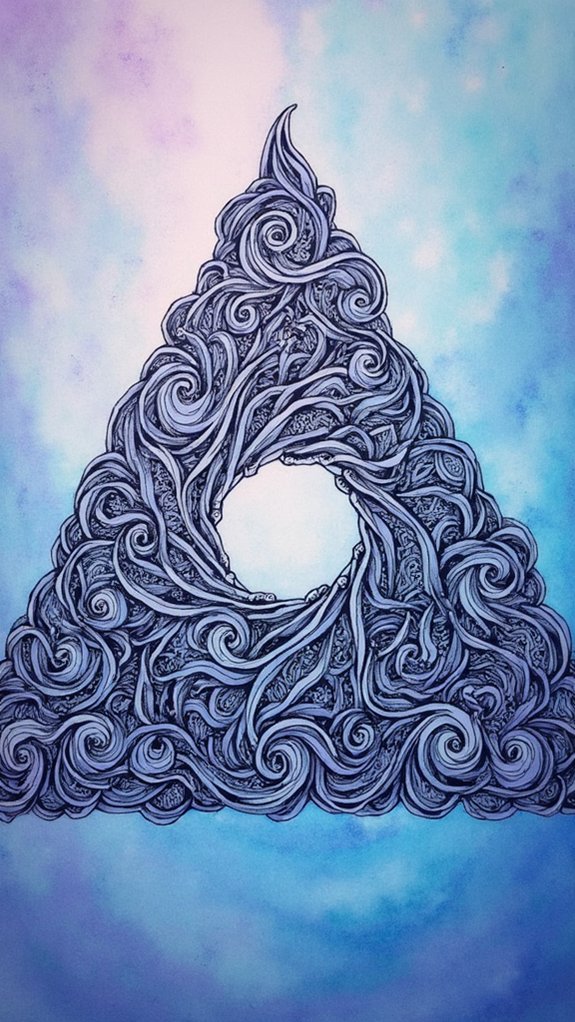
Ready to jump into some Zentangle magic? The Paradox Triangle starts with a clear triangle shape and things get wild as you fill it with straight lines that twist into a sort of endless optical illusion, all while your brain wonders, “How is this even possible?”
Up next: step-by-step tips to get yours started, plus a look at different pattern ideas (because who doesn’t want their triangle to stand out in a doodle crowd?).
Step-by-Step Creation
To kick things off, every great Zentangle paradox triangle starts with a sturdy triangle shape—think of it as the secret lair where all the pattern magic happens.
First, grab your pencil and draw a solid triangle on your page. Now, get ready to immerse yourself in some zen relaxation techniques! Using mindful doodling, create those trademark interconnected lines, starting from one point and heading toward the opposite side. This builds a cool web of lines that keeps your creative flow buzzing.
Once the sketch is ready, outline with a micron pen, then swipe away any leftover pencil marks for a crisp finish. Finally, time to upgrade—add bouncy borders and funky interior patterns.
- Draw a well-defined triangle base
- Sketch interconnected guide lines
- Outline and erase pencil marks
- Decorate with patterns and borders
Pattern Variations Explained
Once the basic triangle is all set and decked out with some bold outlines, it’s time for the real magic—the pattern party!
Pattern exploration is where things get wild. Some artists might use zigzags that crisscross like a mini lightning storm, while others draw spirals that seem to hypnotize anyone who looks too long.
For an extra dash of design inspiration, try adding little circles along the triangle’s edges or filling sections with different creative techniques. Use a trusty micron pen to keep those lines smooth and snazzy.
As the patterns pile up—some simple, some super complex—it’s like the triangle turns into a three-dimensional mystery. Plus, it’s all totally relaxing; your brain just gets lost in the repeating designs!
Zigzag Waves
Imagine one of those crazy lightning storms, all jagged and wild—that’s the kind of energy zigzag waves bring to Zentangle art. This pattern is all about sharp angles, bouncing back and forth like a game of electrified ping-pong.
To start, simply draw diagonal lines that zig to one side, then zag right back. But wait—here’s where things get exciting. There are all kinds of zigzag techniques and wave variations you can try.
Want to make your design pop even more? Use shading effects to add serious depth. Check out these cool ideas:
- Switch up the thickness for each zigzag for dynamic contrast.
- Space some waves closer, some farther for wild visual rhythm.
- Layer zigzags for a tangled lightning-bolt look.
- Shade the base to create dimensional magic.
Circular Motions
After all those wild zigzags, things are about to take a totally different turn—literally. When it comes to Zentangle, circular motions twist doodling into a whole new game.
Instead of sharp lines, artists let their pencils dance in a circular rhythm, starting from a point and working their way out like gentle raindrops hitting puddles. Suddenly, the page comes alive! Some circles stay empty, others get their surroundings filled in, turning the pattern into a bold play of dark and light.
That visual contrast? Instant eye-catcher. There’s a ton of room for creative exploration too, because every circle is a chance to show off personality.
Plus, all this circling helps your hand-eye coordination—a Zentangle workout, minus the sweat.
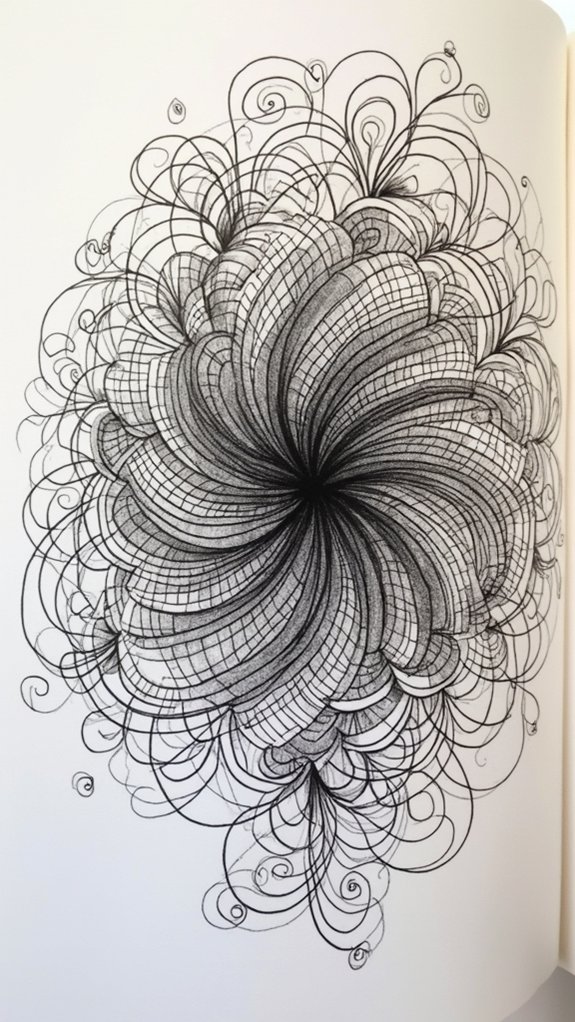
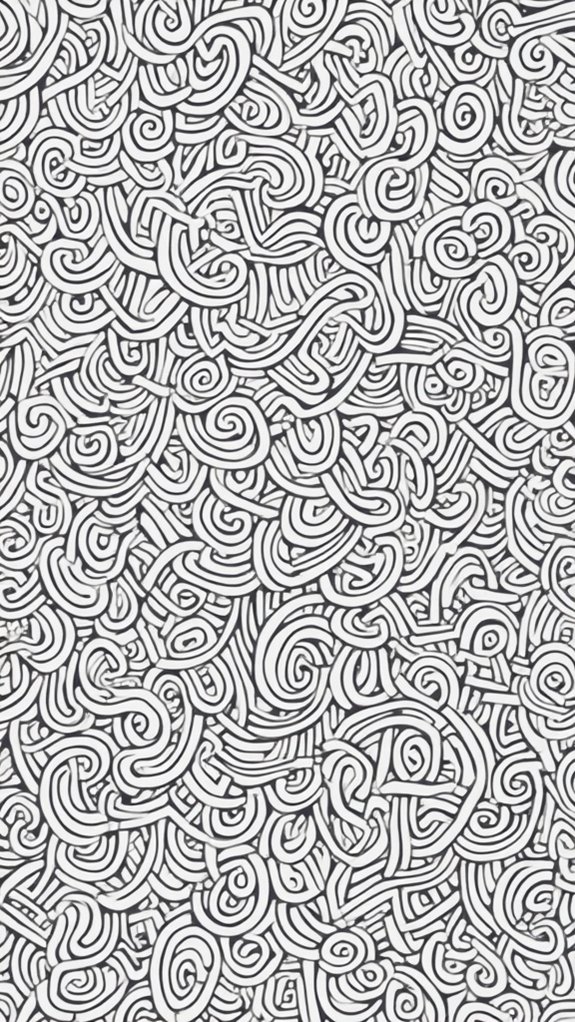
Spiral Swirl
There’s something totally mesmerizing about the Spiral Swirl pattern. People just can’t help but get lost in its hypnotic loops!
This pattern starts with simple spiral techniques—just pick a central point and swirl outward, connecting each spiral as you go. Want to make it pop? Try creative shading in the inner curves; suddenly it looks like the swirls are jumping off the page!
Plus, playing around with the size and distance of each swirl keeps things interesting and totally custom. Spiral Swirls are also fantastic for mindful drawing, since focusing on steady, careful lines is soothing and even a little meditative.
Here are some tips to master this awesome pattern:
- Start from a center point
- Vary spiral sizes and spacing
- Add creative shading
- Practice mindful drawing
Wavy Line Patterns
Wavy line patterns might just be the secret sauce in Zentangle art—they instantly add movement and, honestly, a bit of drama!
When artists play with wavy line techniques, it’s like their pen is dancing—curvy shapes swoop, dip, and twist, filling the page with energy. This style isn’t just about looking cool; it’s a fantastic way to explore fluidity expression.
With each stroke, artists can mess around with pattern experimentation, trying lines that are thick, thin, tight, or widely spaced. Even beginners will love these patterns since wavy lines are easy to pick up—you can’t really mess them up!
Throw in some alternating waves and a touch of shading, and suddenly, the drawing pops with rhythm, depth, and plenty of stylish balance.
L-Shaped Repeats
Get ready, because L-Shaped repeats might just become your new Zentangle favorite—they’re both satisfying and surprisingly easy to create!
Anyone can follow a step-by-step pattern that starts with simple L-shaped lines, then switches things up with bold color choices and creative twists.
Step-by-Step Pattern Creation
Jump right in with L-shaped repeats—this pattern is like giving your Zentangle some serious attitude!
Starting this step-by-step pattern creation is all about L shapes exploration, pushing simple lines into eye-catching, dynamic designs. First, set up the space by dividing your paper with bold vertical partitions. These slices help organize everything and build pattern balance from the start.
After that, the real fun begins—time to drop those L shapes!
- Draw L shapes in each section, mixing up their size and direction for extra flair.
- Fill the tops of each L with solid black for sharp, dramatic contrast.
- Make sure your L shapes are evenly spaced—balance is key!
- Experiment with thick and thin lines to make things pop.
Suddenly, these simple shapes become art with attitude!
Visual Impact and Variations
A burst of bold L-shaped repeats can instantly turn a Zentangle from basic to electrifying. When artists play with L shape dynamics, it’s like giving the design a whole new personality—some corners look sharp and snappy, while others feel soft and calming. This isn’t just about drawing an “L”; it’s about stacking, flipping, and tweaking those shapes to create real visual harmony. Adding pattern layering inside each “L” brings the design to life, like decorating tiny puzzle pieces. And hey, don’t forget color—switching palettes or line thickness makes each section pop. Want to see how L-shaped patterns mix things up? Check out this table comparing variation options:
| Variation | Visual Effect |
|---|---|
| Size change | Adds depth |
| Rotation | Boosts movement |
| Filling patterns | Grows complexity |
| Color swaps | Highlights layers |
| Spacing shifts | Increases rhythm |
Chessboard Boxes
Imagine a pattern so classic that it practically shouts “checkmate!”—that’s the chessboard boxes in the world of doodle Zentangle.
There’s something seriously cool about these organized squares lining up in perfect rows. To build this iconic grid, artists use chessboard design techniques, making sure every line is straight and each square is the same size.
But here’s where it gets fun: the pattern filling methods come into play! Artists don’t just color in every other square—they might fill them with wild spirals, sharp hatching, or even tiny dots. The real magic? Shading effects exploration, which brings the design to life.
- Sketch a neat grid for uniform squares
- Alternate patterns for dynamic visuals
- Add shading for 3D vibes
- Use as a base for bigger art
Connected Dots
Sometimes, what looks like just a bunch of dots on a page actually has the power to turn into something totally mesmerizing—welcome to the world of Connected Dots!
This zentangle pattern is all about placing dots, then linking them up with lines or funky shapes using various dot connection techniques. One minute you’ve got a blank page, and the next you’re making spontaneous designs that bend, twist, and swirl however your imagination allows.
There’s no need to be a perfectionist—even wonky lines give the pattern more character! Artistic expression shines here, because every set of connected dots tells a different story.
And guess what? Just moving from dot to dot feels super relaxing, like your stress gets left behind at every tiny connection.
Mountain Landscape Zentangle

Towering peaks, swirling clouds, and winding rivers—mountain scenery zentangles are like nature adventures trapped on a piece of paper, just waiting to burst out with every stroke.
Drawing these epic vistas lets artists practice nature appreciation, all while getting swept up in zentangle techniques that bring rocky heights and peaceful valleys to life.
Every repetitive pattern, curvy line, or wild zigzag fuels artistic mindfulness, making you feel like a creative explorer hiking through your own mountainous world.
- Use zigzag and curvy lines to capture the rough terrain and drifting clouds.
- Add shading to make mountains pop out, almost enough to climb!
- Toss in trees, rivers, or even a sneaky deer for a vibe straight out of a postcard.
- Repeating patterns help you relax, making your brain as chill as a mountain breeze.
Frequently Asked Questions
What Materials Do I Need to Start Doodling Zentangle Patterns?
Beginning Zentangle doodle techniques requires essential supplies: smooth paper, fine-tipped pens, pencils, and erasers. Artists may seek pattern inspiration from nature or online resources to explore diverse designs and further enhance their creative process and results.
Can Children Benefit From Practicing Zentangle Art?
The current question explores whether children can benefit from practicing zentangle art. This artistic activity can offer a creativity boost, support fine motor skills development, and lead to focus enhancement, making it valuable for young learners’ growth.
How Often Should I Practice for Optimal Relaxation?
Determining ideal relaxation from mindful doodling techniques often depends on consistency. Experts suggest daily practice benefits individuals most. Creating a routine, even for just a few minutes each day, can enhance relaxation and support overall well-being.
Are There Digital Tools for Creating Zentangle Designs?
The current question explores the existence of digital applications that assist with creating intricate designs. Numerous graphic design tools and online resources enable users to craft Zentangle-inspired artwork, offering features like symmetry, layering, and customizable brush settings for creativity.
Does Zentangle Help With Anxiety or Mental Health?
The current question explores whether Zentangle benefits anxiety or mental health. Studies suggest that Mindfulness techniques and Creative expression involved in Zentangle can promote relaxation, reduce stress, and enhance overall mental well-being, supporting positive mental health outcomes for participants.
Conclusion
Doodling these zentangle patterns isn’t just fun—it’s like giving your brain a mini-vacation. Whether it’s curvy Crescent Moons or wild Zigzag Waves, each design helps chase away stress and boredom. Plus, the best part? There’s no way to mess up; mistakes turn into masterpieces! Anyone with a pen and some patience can do it. So next time your mind needs a break, grab some paper and see where these patterns take you. Creativity, unleashed!
Leave a Reply