
Drawing 3D art with a pencil starts with simple tools—just a mix of pencils, smooth paper, and maybe a blending stump or your finger for smudging. Begin by sketching wire frame shapes, practicing cubes, cylinders, and spheres with light guidelines. Shading is key: figure out where your light source is, then use darker pencil strokes for shadows and lighten up for highlights. Mistakes happen, but that’s part of the fun—each fix shapes your art. Stick around for tricks to level up!
Key Takeaways
- Use a range of pencils from hard (2H) to soft (6B) for clean lines and effective shading.
- Begin by sketching simple wireframe shapes and basic forms like cubes, cylinders, and spheres to understand perspective and structure.
- Apply light guidelines and keep initial lines faint to maintain flexibility for corrections and proportional adjustments.
- Master shading techniques by observing a single light source, building gradients, and blending smoothly to create realistic depth.
- Regularly practice and refine your drawings, using guidelines and erasers to fix mistakes and improve 3D effects.
Essential Materials for 3D Pencil Drawing

Not every artist starts with a mountain of fancy supplies, but picking the right materials makes drawing 3D stuff way cooler—and way easier!
First up, the pencil: artists like to keep a mix, from hard (2H) to super soft (6B). Hard pencils make light, crisp lines, while softer ones are perfect for bold shading.
Next, drawing paper is a real game-changer. Smooth paper means clean lines and serious control when you’re trying to create shades that actually look 3D.
Blending tools—like blending stumps or tortillons—help smooth out those pencil strokes so everything looks realistic, not streaky.
Oh, and don’t forget a kneaded eraser! It’s great for erasing mistakes and even making highlights pop.
No fancy art store required—just smart choices!
Building Basic Wire Frame Shapes

Envision this: laying down the “skeleton” of your drawing, just like an architect makes blueprints before building a house.
When starting 3D art, artists use wire frame sketches to set up the basic shapes first—think cubes, spheres, or ellipses for cylinders. Imagine the shapes as if you’re building with invisible LEGOs, stacking and connecting them to form your masterpiece.
Building 3D art starts with wire frame sketches—think invisible LEGO bricks stacking up into the shapes of your imagination.
Vertical lines help lock in the height and symmetry, keeping everything from leaning like it partied too hard. Connecting lines set up the “bones” of cubes, while a light cross guideline keeps features balanced and even.
The wire frame lets artists really see the 3D space, like X-ray vision for your imagination, getting you ready to build bigger, cooler things on top.
Creating Cylinders and Cones Using Guidelines

Building a cylinder or a cone starts with some simple shapes and the secret weapon—guidelines! These lines help artists get everything in the right place, so the cylinder looks solid and the cone doesn’t end up lopsided like a sad party hat.
With a focus on proportion, symmetry, and careful placement of these guides, anyone can make these 3D forms stand out on the page.
Constructing Cylinder Wireframes
Immerse yourself in 3D drawing by sketching some wireframe shapes—cylinders and cones are a great place to start.
These forms might not look flashy at first, but trust that every Art School pro began with these basics.
Want your Line Art to pop? Follow this handy 3-step guide (and please subscribe for more tips):
- Draw a tight ellipse for the base—make sure it’s even, not a sneaky egg! This sets the 3D stage.
- Extend matching vertical lines from each side of the ellipse. These become the cylinder’s sides, stretching back like a soda can.
- Top with a second ellipse, using guidelines to match the base. Check for symmetry—crooked wireframes give off wobbly vibes!
Mastering cylinder wireframes makes everything else way easier—promise.
Cone Proportion and Symmetry
Symmetry is the secret ingredient that makes a cone look sharp, not sad and wonky.
In Art, if you want your 3D cones to pop off the page, you have to get the proportions right. Start by sketching a light ellipse—this will be the cone’s base. Make sure the right side of the ellipse peeks slightly in front, giving a cool perspective effect next to any cylinder.
I’ll show you how: draw a vertical line up from the center of the ellipse as your height guideline. Next, connect the ends of the ellipse to the top point of this line.
Remember to keep both sides even by using a faint cross for balance. Always eyeball the proportions—wobbly cones are out, awesome Art is in!
Guideline Placement for Accuracy
There’s a real magic trick to making shapes like cylinders and cones look truly 3D on paper—guidelines!
Even pros swear by this classic hack. First, setting a light cross on your page is way more helpful than it looks. Guideline importance can’t be ignored if drawing precision is your goal, and let’s be honest, keeping your shapes from going wonky is a win for everyone.
Want to keep your cylinders and cones looking sharp and balanced every time? Here’s how:
- Draw a light cross to maintain symmetry for both cylinders and cones.
- For a cylinder, draw ellipses at the top and base, using vertical guidelines to align them precisely.
- For cones, center your base ellipse and use the guideline to pull the sides up to the perfect point.
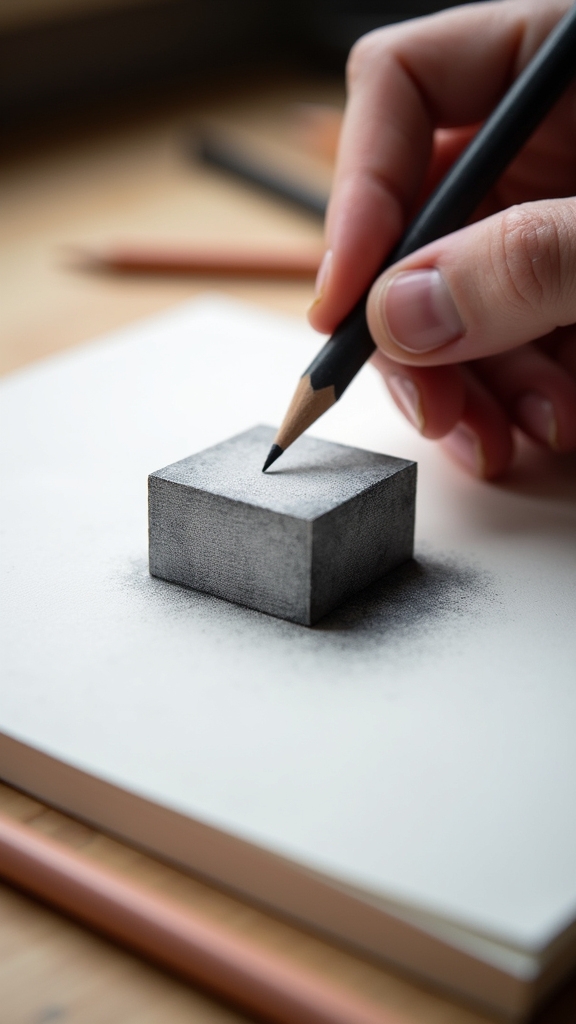
Drawing Cubes and Exploring Perspective

Drawing cubes is where things start to look seriously cool, and building a wireframe is like seeing the secret bones inside the shape.
With just some careful lines and a good understanding of basic perspective, anyone can make a simple set of boxes seem to jump right off the page.
Get ready, because once you get the hang of cubes, you’ll start spotting 3D boxes everywhere—including your own stack of homework.
Building Cube Wireframes
Step right into the world of cubes—it’s where basic shapes start looking seriously cool!
Building cube wireframes is a fun way to boost your art skills, and it’s perfect for anyone excited about showing off cube dimensions, wireframe techniques, and depth perception.
Here’s how it works:
- Start by sketching three vertical lines, all the same height—this sets your cube’s front edge.
- Connect the tops and bottoms of those lines with two horizontal lines for the front face, then add another vertical line at the back.
- Draw angled lines from the top and bottom corners of the front face to the back line.
Now, your cube looks see-through, like X-ray vision!
Use these steps to wow your friends—you’re turning geometry into awesome 3D art!
Understanding Basic Perspective
Moving past wireframes and into the wild world of perspective transforms basic cubes into something way more eye-popping. By using perspective techniques, things get real fast—almost like magic. Start by sketching three equal vertical lines, then connect them at angles, aiming those lines toward imaginary vanishing points. Now, the cubes start to pop! Horizon lines become your best buddy, showing where the sky meets the ground and where all your vanishing points will hide. Don’t be afraid to use a light cross to make your cubes symmetrical and perfectly placed. And when you add shading? Boom—your cubes go full 3D! Here’s a quick table for some visual backup:
| Step | What to Do | Key Tip |
|---|---|---|
| 1: Vertical | Draw 3 equidistant lines | Keep them parallel |
| 2: Connect | Add angled lines | Aim at vanishing points |
| 3: Horizon | Add horizon line | Align it with eye level |
| 4: Shade | Darken shadow sides | Shows direction of light |
Forming Circles and Spheres for Realistic Volume

A perfect circle might look simple, but trust—getting it right takes a bit of strategy and a little bit of pencil magic.
To nail those circles and turn them into realistic spheres, artists lean on some seriously helpful tricks. Here’s how it goes:
- Start with circle symmetry techniques. Lightly sketch a cross where you want your circle, then use it to guide your pencil for awesome proportions. Divide the circle into four quarters to keep it honest and round.
- Move on to sphere shading methods. Imagine wrapping wire around your circle like a basketball, picturing its 3D space.
- Add those volume enhancement tips. Leave space around your shape, and use soft pencils to blend gradual tones—making your sphere pop right off the page, almost good enough to juggle!
Mastering Shading to Add Depth
Once a circle turns into a convincing sphere, the magic really starts with shading. This is where 3D art seriously pops off the page!
To nail that depth illusion, artists keep the light direction in mind—basically, where’s the “sun” hitting your shape? The side facing away from the light gets darker; that’s where a 4B pencil comes in handy for deep shadows.
Remember, the magic happens when you know where your “sun” shines—shade the far side deep, and watch your sphere come alive.
Try shading techniques like using the side of your pencil for broad, smooth areas. Got a flat surface? Lay down a flat tone. For curves, go for a smooth gradient.
Blend softly, avoid sharp lines, and step back to check your progress. After shading, erase any stray marks, so your highlights shine bright, and everything looks clean and super 3D.
Common Mistakes and How to Fix Them

Crack open a sketchbook, and mistakes pretty much sneak in before you even realize it—everyone does them, trust that!
Whether it’s wobbly lines or funky-looking cubes, common errors trip up the best of beginners. Relax, mistakes are part of learning.
Here’s how to dodge the most common 3D drawing blunders:
- Skip the Guesswork: Not using guidelines means things get lopsided. Lightly sketch a cross or stick-figure wireframe for better balance.
- Respect the Shadows: If shading techniques ignore the light source, shapes look super flat. Always pick a direction for your light and be consistent!
- Watch That Line Weight: Heavy lines all over? Not great for 3D effects. Keep early lines light and only go bold once you clean up.
Practice, erase, repeat!
Frequently Asked Questions
How to Draw 3D Art With a Pencil?
To draw 3D art with a pencil, one applies perspective techniques to basic shapes, utilizes appropriate drawing materials, and practices shading methods to achieve depth. Attention to proportions and consistent light sources enhances realism in the final artwork.
What Can a 7 Year Old Draw?
A 7-year-old can draw simple shapes, which serve as building blocks for more complex images. Fun patterns and creative animals also inspire young artists, allowing them to develop imagination, confidence, and basic drawing skills through enjoyable activities.
How to Draw a 3D Object Step by Step?
To draw a 3D object step by step, one begins with perspective techniques to outline object proportions, sketches basic shapes, then applies shading methods based on light direction, gradually building realistic depth and dimension to the form.
How Do You Start a 3D Sketch?
To start a 3D sketch, an artist selects appropriate sketching materials, sets up perspective techniques using guidelines and wireframes, and maps basic forms. Shading basics are introduced early to indicate light, volume, and depth for realism.
Conclusion
Drawing 3D art with just a pencil might seem like wizard-level stuff, but honestly, it’s totally doable. With some basic shapes, a little shading magic, and lots of practice (plus a good eraser for “creative fixes”), anyone can make their drawings pop off the page. Remember, even the best artists started with wobbly cubes and lopsided spheres. So, grab that pencil, keep experimenting, and let your imagination jump into the third dimension—mistakes and all!
Leave a Reply