
Starting a sketchbook shouldn’t feel impossible—there are plenty of easy, creative ideas to try! Beginners can draw an old pair of shoes, a messy stack of books, or the view outside their window. Maybe try sketching a bunch of flowers, fruit from the kitchen, or your own hands making funny poses. Even a bent bicycle or a mug with weird reflections works. You could doodle an open book, a cloth tossed over a table, or experiment with shadows—these simple ideas can spark big creativity, and there’s even more inspiration just ahead.
Key Takeaways
- Sketch everyday objects like shoes or mugs to practice basic shapes, textures, and shadows.
- Draw a stack of books or an open book to improve perspective and overlapping techniques.
- Illustrate kitchen fruits, experimenting with slicing and different colors to enhance skills in form and shading.
- Create simple floral arrangements or single flowers, focusing on petal shapes and vase reflections.
- Practice capturing shadows beneath objects to develop a sense of depth and three-dimensionality.
Draw an Old Pair of Shoes

There’s something oddly fascinating about an old pair of shoes. They might look tired, but they’re packed full of character—each scuff, crease, and sag tells a story.
As a still life subject, old shoes give beginners a perfect chance to practice sketching textures and details. Want to capture the right vibe? Try viewing the shoes from different angles—sometimes a side view highlights those wrinkled toes, while a top view shows every tangled lace.
Shadows can work magic here, too, creating depth and making the shoes really pop. And don’t be afraid to toss in a bit of environment, like a doormat or a sock peeking out.
Old shoes might smell funky, but they sure are beautiful on paper!
Sketch a Stack of Books
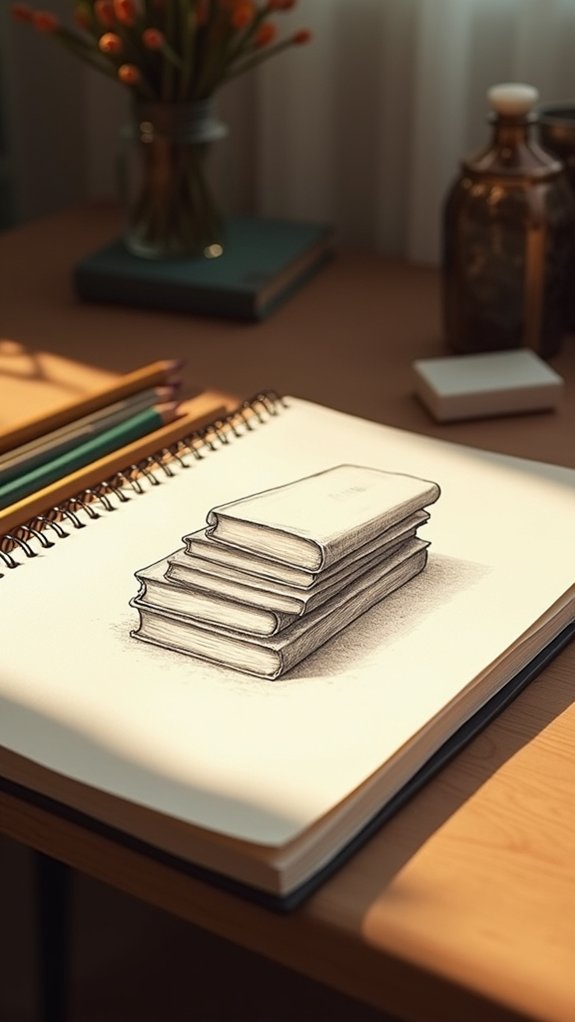
Sketching a stack of books can be way more exciting than it sounds if you mix things up—try arranging them at different angles, letting covers peek out and edges crisscross for a cool, layered look.
Notice how the books overlap and mess with each other’s shadows; this is where shading brings the whole scene to life, turning flat rectangles into a pile you wish you could pull from.
Focus on these details and suddenly your drawing has depth, personality, and maybe even a hidden story or two.
Arranging Books Creatively
A pile of books might sound boring at first, but arranging them in a sketch can actually turn into a super fun creative adventure.
Imagine grabbing your first sketchbook and experimenting with stacks of books—get wild with it! Try leaning some, stacking them tall, or flipping a few open so covers and pages peek out. The more colorful, the better.
Different angles make your scene pop, so go for a bird’s-eye view or a dramatic low shot. Toss in details like a cozy blanket, reading glasses, or a steaming mug of tea to make your sketch extra cozy.
With careful shading and close attention to unique covers, your drawing will capture so much personality, you might expect the books to start chatting!
Capturing Overlapping Edges
Once those books are stacked in all sorts of wild ways, the real magic starts at their overlapping edges. This is where a sketchbook page transforms from “just rectangles” to a real puzzle of lines, angles, and shapes that seem to dance together.
To catch all that action, beginners should start with light pencil strokes, outlining each book’s basic rectangle. Notice where the edges cross and disappear—like a secret handshake between pages. Adjust as you go, making sure the stack actually makes sense and doesn’t look like a gravity-defying tower.
Try tilting books or stacking them oddly; the more edges that overlap, the more interesting the sketch gets. Weird overlaps? Celebrate them—they give your sketchbook page personality and a touch of quirky realism.
Creating Depth With Shading
Flip a stack of books onto your sketchbook page, and things instantly get more exciting—it’s time to turn those flat rectangles into a real, three-dimensional pile using the power of shading.
Start by outlining your books, and don’t forget those overlapping corners; they make your stack look extra realistic. Eye your light source, because that’s where shading comes in! Press harder for those deep, shadowy sides away from the light, and lighten up your pencil strokes for the areas catching the glow.
Throw in some cross-hatching or stippling to hint at worn spines or textured covers. Not all books need to line up perfectly, either—angle them a bit for a wild, wobbly arrangement that screams, “I’m full of character, and I know depth!”
Illustrate the View From Your Window

Even if the view outside isn’t exactly a tropical paradise, there’s something magical about sketching what lies beyond the window. Start with a simple contour drawing of rooftops, trees, or whatever catches your eye. Don’t sweat the details yet; just outline the main shapes to build your composition.
Want to capture that shifting light or the shadows creeping across the ground? Try watching how the scene changes at different times of day. Fun fact: your window frame makes a perfect natural border—it helps your drawing feel focused and gives you a cool sense of depth.
Spice things up by tossing in people walking by or a car zipping past. Mix up your drawing techniques, maybe some cross-hatching for trees or stippling for bricks!
Draw Fruits From Your Kitchen

Grab some of those colorful fruits from the kitchen and turn your sketchbook into a mini art studio. Sketching fruits like apples, bananas, or oranges isn’t just fun—it’s a total feast for your eyes.
Try picking a mix of shapes and colors to make your page pop. Want to bump up the “wow” factor? Slice a fruit in half and draw what you see inside, seeds and all.
Pay attention to the light—shadows and highlights make your fruits look 3D, almost like they’ll roll off the paper. Experiment with different angles too; a banana looks wild from the top!
Use colored pencils or watercolors to match those wild, juicy hues, and enjoy practicing shading, blending, and, yes, even a little messiness!
Capture Your Hands in Different Gestures
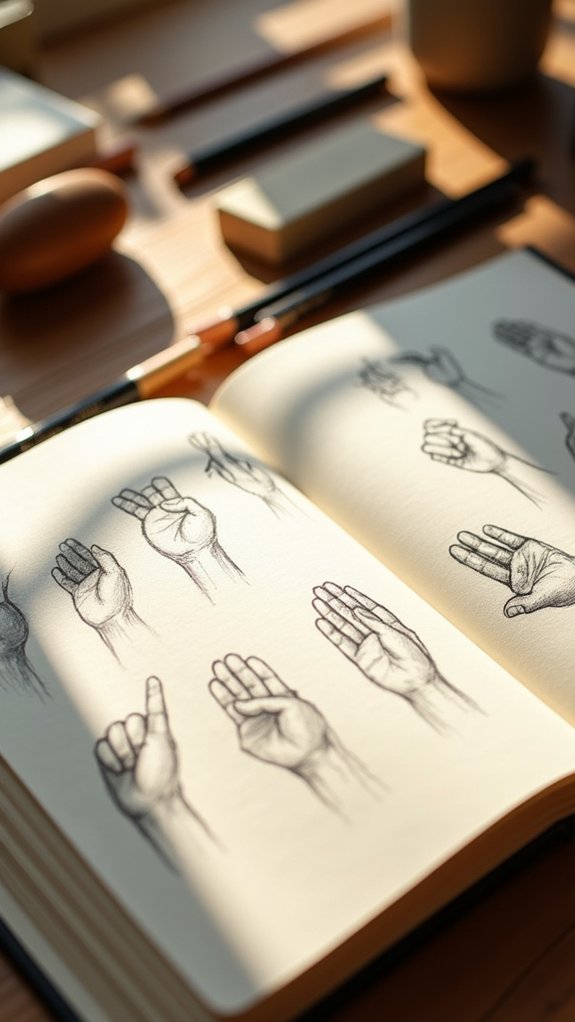
After filling a sketchbook page with juicy fruits, it’s time to look at something everyone has right in front of them: their own hands.
Drawing hands can be a wild adventure—they bend, twist, flex, and sometimes seem to have a mind of their own! Capturing different gestures helps beginners understand contour and how fingers relate to each other.
Try using a mirror to spot cool angles or sketch your hand holding a pencil, a spoon, or maybe even your sketchbook (mind-bending, right?). Notice the shape of knuckles, creases, and even those mysterious skin lines.
Don’t be afraid to use charcoal or ink if you want bold shadows. Each drawing is like a selfie for your sketchbook—except, you know, just the hands.
Create a Simple Still Life of Keys and Coins

Metallic treasures like keys and coins might not seem like the stars of a sketchbook page, but they’ve got surprise potential written all over them.
When looking for Drawing Ideas, beginners can grab a handful of keys, toss in a few coins, and set them up on a table. Try different layouts—pile them up, stretch them out, maybe even make a face!
The magic comes alive in their odd shapes, funky textures, and those shiny highlights where the light hits. Focus on the way keys have tricky teeth and cool designs, and how coins show off their colors and age.
Practice drawing them from side and above to explore their forms, then play with a simple background to make them pop even more.
Sketch Your Favorite Mug

Sketching your favorite mug gives you the perfect chance to check out all its cool shapes—maybe it’s chunky and round or tall with a super weird handle.
Try making it look real by playing around with textures, like showing off that shiny glaze or rough ceramic with some wild shading techniques.
Shadows can be tricky, but messing around with where the light hits can turn your regular mug into a superstar on the page, almost like it’s ready for a spiffy mugshot.
Exploring Mug Shapes
Even though it might seem like just an ordinary cup, a favorite mug can actually be pretty amazing when you really look at it. There’s something kind of magical about noticing that perfect curve on the handle or the way the rim feels under your lip.
When trying this easy drawing exercise, they might start by picking up their mug and observing every bump, twist, or quirky spot it has. Sketching from different angles, like a dramatic top-down view or a lazy side profile, makes things more fun and helps beginners understand how shapes look in 3D.
Some mugs have bold patterns or funny designs, so why not add those too? Plus, including a swirl of cocoa or tea brings personality—like the mug is almost telling its own story.
Playing With Textures
Some mugs don’t just have interesting shapes—they’re packed with all sorts of wild textures, too. Think bumpy grooves, swirly patterns, or even random engravings.
When someone sketches their favorite mug, diving into these unusual surfaces can help improve their artistic skills. Using techniques like hatching or stippling, an artist can capture the roughness, smoothness, or even bumpiness that makes the mug stand out.
Switching between pencil, ink, or colored pencils also helps highlight different details. It’s not just about the mug, either—the way the environment reflects on the ceramic can add surprises and challenges.
Honestly, a good mug isn’t just for hot chocolate; it’s a great way to test how creative someone can get with their drawing.
Experimenting With Shadows
Although it may look simple at first, capturing shadows on a mug can totally crank up the drama in a sketch. First, notice the mug’s basic shape, maybe it’s got a funky handle or a cool pattern—start with those!
Next, squint your eyes and find where the light hits and where shadows hide. Using a pencil or pen, try pressing down harder or lighter to get those shadows just right, making your mug look super 3D.
Toss in some hatching or cross-hatching on the darker spots, and hey, don’t forget the surface the mug sits on! Shadows stretch and twist there, making your drawing look even cooler.
Shadows might seem sneaky, but with a little patience, they’re not so scary!
Draw a Bunch of Flowers in a Vase
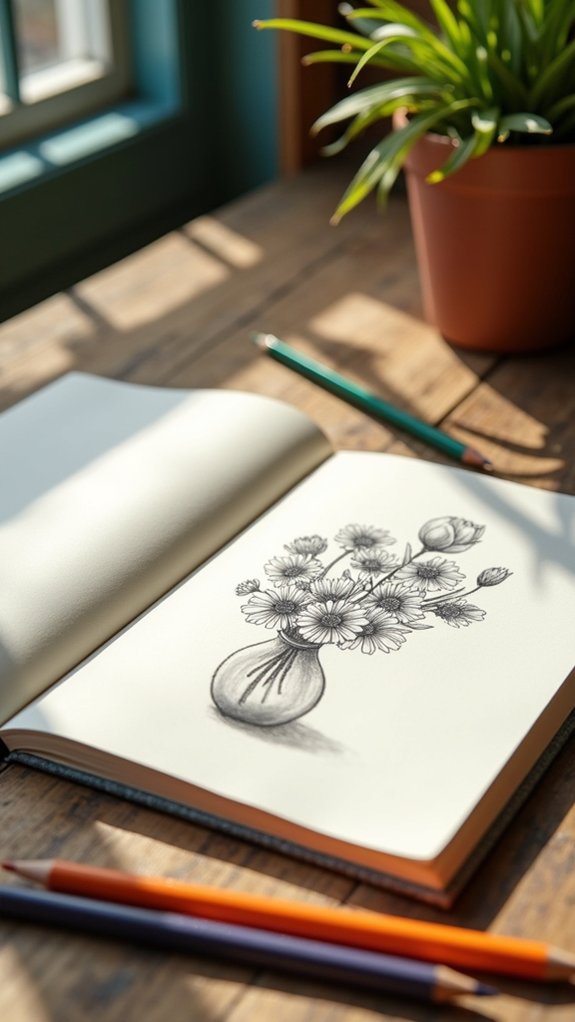
There’s nothing quite like sketching a bunch of flowers in a vase—it’s basically like throwing a little party on your sketchbook page.
First, imagine picking out your favorite flowers. Maybe some fluffy daisies, twisty tulips, and pointy leaves—go wild! Mix big blooms with little buds for extra fun, and remember to experiment with colors and crisp shapes for maximum visual art energy.
When it comes to the vase, focus on its curves and edges; a bit of light and shadow here can totally make it pop off the page. Don’t forget to play with different angles; maybe look straight down or from the side for a dramatic twist.
Finally, add a background or a tablecloth, tying everything together like the ultimate creative bouquet.
Illustrate an Open Book From an Interesting Angle

Books—especially open ones—are like secret doors waiting for someone to peek inside. When sketching an open book, there’s magic in exploring new angles, almost like spying on a secret meeting between pages.
Maybe the book is resting on a textured table, or cozied up next to an old pair of reading glasses, hinting at the person who left it behind.
To bring your drawing to life, try this:
- Pick a dramatic angle, like looking down from above or tilting the spine forward.
- Add details—tiny printed words, dog-eared corners, or faint smudges on the pages.
- Think about light and shadow, with sunlight spilling across the open pages.
- Place your book against a contrasting background, making it pop—even more than an old pair of shoes!
Draw a Bicycle From Memory or Reference

Drawing a bicycle can seem tricky at first, but paying attention to its main parts—like the wheels, frame, and handlebars—makes it way less overwhelming.
Practicing from memory is like giving your brain a workout, helping you remember how a bike fits together even when you can’t see one right in front of you.
Spotting all those little details, and then trying to recreate them, can turn what could have been a wobbly “bike-ish” doodle into something that actually looks ready to ride.
Observing Key Bicycle Elements
Even if the word “bicycle” just makes someone think of wobbly rides and scraped knees, sketching one can be an adventure all on its own.
To really nail the look, beginners might want to study the key parts closely—kind of like being a detective, but with a sketchbook instead of a magnifying glass!
Watch how the bicycle’s classic curves mesh with the strong straight lines. Try to picture where the human figure would fit, too.
Here’s how to break it down:
- Shape it up using circles, rectangles, and ovals for wheels, frame, seat, and handlebars.
- Double-check those proportions—don’t let tiny wheels steal the show!
- Add fun details: spokes, pedals, the mighty chain.
- Experiment! Draw from different angles and shade to show shine and shadow.
Enhancing Memory Drawing Skills
Trying to draw a bicycle from memory is kind of like playing a mental game of “What Did I Just See?”—and it’s trickier than it sounds! Forgetting a pedal or putting the chain in the wrong spot is almost a rite of passage.
A fun twist is using a blind contour trick: draw without looking at your page, forcing your brain to really focus on what you remember seeing. When you get stuck, peek at a reference photo to spot what you missed—maybe your wheels are ovals instead of circles!
Breaking the bike into simple shapes (like a couple of pizzas and a popsicle stick) helps, too. With practice, you’ll start noticing details everywhere and gain confidence for drawing from memory or real life.
Sketch a Cloth Draped Over a Table

There’s something almost magical about the way a simple cloth drapes over a table, full of twists, folds, and shadows that invite your pencil to jump in.
Drawing this everyday object might seem tough at first, but it’s like solving a visual puzzle. Beginners can learn so much just by observing how gravity tugs on fabric, twisting and stretching it in unexpected ways.
To break it down, try this:
- Start with simple shapes—sketch rectangles or ovals to mark where the cloth falls.
- Study the folds and gathers—see where the fabric bunches up or smooths out.
- Notice shadows and highlights, especially how the light makes the cloth pop.
- Experiment with different pencil marks to show texture—smooth, rough, or maybe even fluffy!
Frequently Asked Questions
What Is the Easiest Thing to Sketch for Beginners?
When considering the easiest thing to sketch for beginners, simple shapes—such as circles, squares, and triangles—offer an accessible starting point. Practicing these forms helps develop basic drawing skills and confidence before progressing to more complex subjects.
What Should I Draw First in My Sketchbook?
When considering what to draw first in a sketchbook, individuals often look for inspiration sources in their immediate environment. Simple objects, familiar scenes, and everyday items provide accessible starting points, fostering observation skills and creative confidence for beginners.
What Can an 11 Year Old Draw?
When considering what an 11-year-old can draw, animal sketches offer a fun entry point. They might sketch pets, wild animals, or imagined creatures, practicing observation, experimentation with textures, and expressing creativity through different poses or environments.
What Can I Draw in 5 Minutes?
When considering what to draw in five minutes, quick doodles of simple everyday objects, hands, or basic geometric shapes offer immediate inspiration. Rapid gesture sketches and observational drawings from a window also encourage creativity within a short timeframe.
Conclusion
Sketchbooks aren’t just blank pages—they’re secret worlds waiting for your ideas. Whether you’re drawing your old sneakers, a messy fruit bowl, or that weird shadow on your hand, every sketch grows your skills bit by bit. Sure, there’ll be some ugly drawings (everyone has them, promise), but that’s part of the adventure. Grab your pencil, pick an idea, and just go for it. Who knows? Your next doodle might actually surprise you—and maybe even make you laugh.
Leave a Reply