
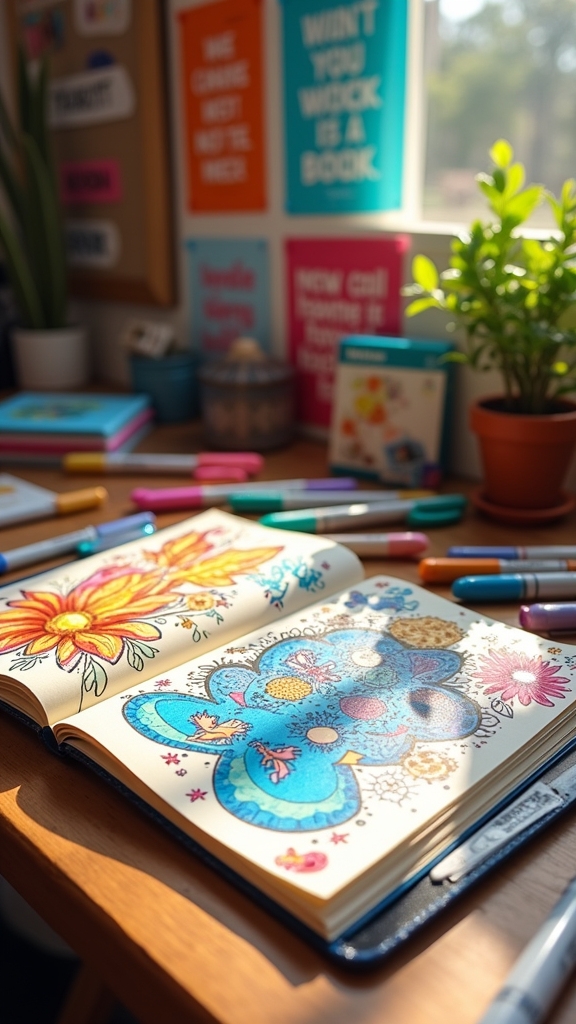
Posca paint pens can totally recharge anyone’s sketchbook with wild, eye-popping ideas—think space adventures with neon swirling galaxies, retro tie-dye bursts, and funky cartoon trees that look straight out of a dream. There’s no stopping at just cosmic scenes, either; try mystical forests, bold streetwear sketches, or even goofy beach days with crabs in sunglasses. Layering, blending, and adding crazy patterns is half the fun, and the colors? Pure magic. Want to try something even more unexpected?
Key Takeaways
- Experiment with cosmic galaxy backgrounds by layering vibrant Posca colors and adding stars for a stunning night sky effect.
- Create whimsical beach scenes using playful details and bold colors for a fun, summery vibe.
- Design bold botanical leaves with overlapping greens, thick outlines, and white highlights for depth and contrast.
- Try retro-inspired tie-dye patterns and pop art animal portraits for eye-catching, graphic sketchbook pages.
- Enhance your sketchbook with creative patterned lettering and expressive emoji faces using contrasting colors and bold outlines.
Space Adventure Scenes
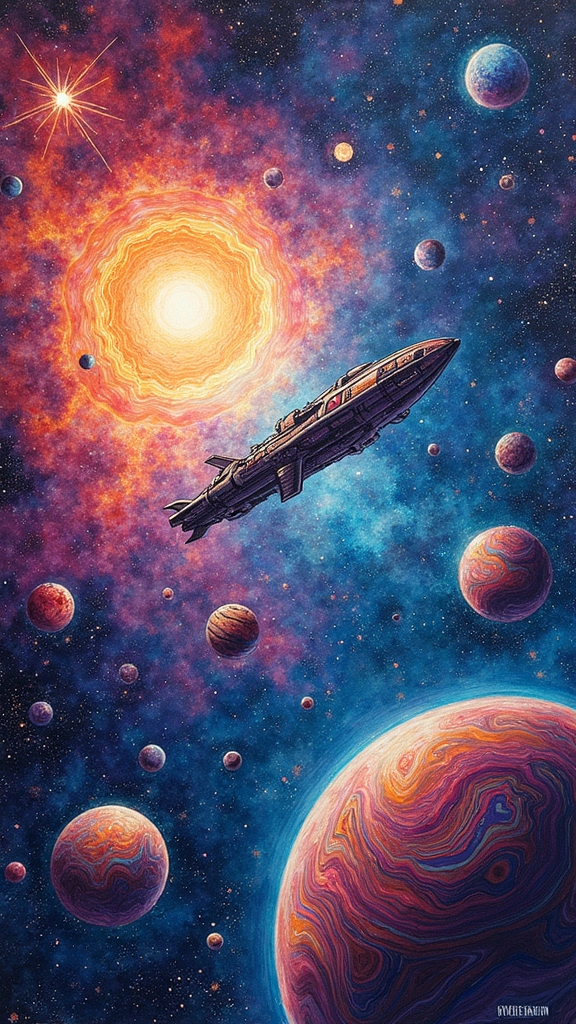
Even if someone’s never been to outer space, they can still create a scene that feels like it’s straight from a sci-fi movie—no astronaut suit required!
Using Posca paint pens, artists can dive right in by covering their sketchbook page with a pitch-black background. This makes any bright color pop like a real star.
Washi tape works like mission control, helping outline rocket windows or planets for super clean, sharp edges. To give the moon or distant worlds some cool texture, blending purples, grays, and whites using Posca adds depth.
Jelly roll pens and white Posca pens are the secret weapons for drawing twinkling stars everywhere. Layering different colors and shapes creates a sense of adventure and dimension, making space scenes totally out of this world.
70s Inspired Tie-Dye Patterns
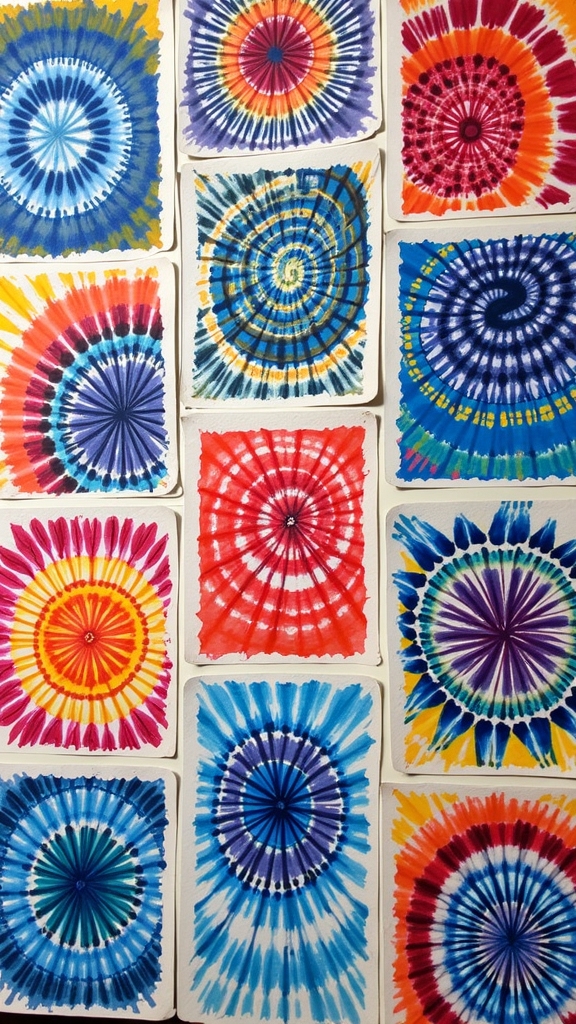
Getting that classic tie-dye look with Posca pens starts with picking a wild retro color palette—think sunshine yellows, popping pinks, and every shade in between.
For extra groovy effects, blending those colors together gives the art a cool, swirling vibe that just screams the ‘70s.
Don’t forget to outline those iconic peace signs and flower shapes with bold black lines, because nothing says “far out” like crisp edges on psychedelic patterns!
Retro Color Palette Choices
While some people think tie-dye is just a blast from the past, retro color palettes are actually making a huge comeback, and they’re anything but boring.
When it comes to using posca paint pens for tie-dye inspired art, picking the right colors is half the fun—and all about catching those groovy vibes. Retro palettes usually mean bright, bold hues that scream the ’70s.
Want to nail the look? Try these tips:
- Start with hot pink, bright orange, electric blue, and sunny yellow to channel authentic retro energy.
- Layer lighter colors first, then add darker shades for extra pop and depth.
- Use complementary pairs like teal and coral for eye-catching contrasts.
- Once dry, outline shapes with black posca paint pens for that sharp, graphic finish.
Now your sketchbook is ready to boogie!
Blending for Groovy Effects
A lot of magic happens when blending with Posca paint pens—suddenly, plain paper transforms into a swirling, groovy masterpiece that looks straight out of a tie-dye T-shirt collection.
The trick is all about blending complementary colors right on the page, letting them swirl and dance together for that classic tie-dye vibe. For extra fun, artists can use bottle caps, sponges, or other random objects to stamp out wild shapes and textures, making every design unique.
To crank up the wow factor, layering lighter shades over dark, once dry, gives the artwork more depth and energy. And if a mistake sneaks in, no worries—a white Posca pen fixes it fast.
With blending, every sketchbook page can burst into a retro, psychedelic celebration!
Outlining Iconic 70s Motifs
When thinking about what really makes 70s-inspired tie-dye art pop, nothing beats outlining those classic, funky motifs—peace signs, lava lamps, and bold flowers that practically shout “groovy!”
With just a few rough shapes sketched out, a whole wave of nostalgia rolls in, making any page look straight out of a retro poster. Posca pens are perfect for this step, letting artists bring bold colors and smooth lines together without any hassle.
For a polished look, thick black outlines really make those shapes stand out, almost like stickers you want to peel off and slap on your notebook.
Here’s a quick guide to outlining iconic 70s motifs:
- Sketch loose shapes (lava lamps, peace signs, flowers).
- Blend vibrant colors for tie-dye backgrounds.
- Trace motifs with thick black Posca pens.
- Use a white Posca pen for quick fixes.
Abstract Cartoon Trees

Abstract cartoon trees are all about bold color choices, wacky outlines, and tops that look nothing like real leaves—think scallops, rainbows, or even lightning bolts.
A cool trick is picking one color for the trunk and branches, then going wild with the canopy shapes and patterns so your tree looks like it belongs in a comic book.
Whether you go for neon pink bark or a canopy covered in zigzags, the more unexpected your choices, the more your tree pops off the page—kind of like it’s ready to tell a joke.
Choosing Tree Color Palettes
Color explosions make cartoon trees come alive, and picking the perfect palette is like choosing the coolest outfit for your tree.
Even though classic green is a go-to, there’s a whole world of colors waiting to be explored. Abstract cartoon trees look especially awesome when you get creative with unexpected combinations.
Here are four smart ways to choose your palette:
- Try a monochromatic scheme—stick to different shades of one color, like navy blue or all kinds of green.
- Go bold with complementary colors—think purple leaves with a yellow trunk for serious pop.
- Use pastel shades for a dreamy, magical vibe—soft pinks, blues, and mint greens totally work.
- Play with blending—mix light and dark tones to create highlights, shadows, and cool tree textures.
Cartoonish Outlining Techniques
Bold outlines can totally transform a basic tree doodle into an eye-popping cartoon masterpiece. When I’m using Posca pens, the trick is to pick one color—like navy blue—for the trunk and branches. This keeps things looking sharp and not messy.
Next, get wild with a thick black outline around the entire tree. It’s like giving your drawing a superhero cape, instantly making it stand out. For the tree canopy, experiment with fun shapes—scallops or rainbows are perfect for a playful vibe.
Don’t forget the background! I’m using a bright, contrasting color to really make the tree pop. And if you mess up a line (it happens), just grab a white Posca pen and tidy things up. Easy fixes, maximum wow factor!
Unique Canopy Shape Ideas
Even though trees in real life usually have leaves shaped like fluffy clouds or bunchy ovals, there’s nothing stopping someone from getting super creative with cartoon tree canopies.
In fact, coming up with really cool, unique canopy shapes is one of the best ways to make your sketchbook pop! Why settle for basic when you can try:
- Drawing canopies with scalloped edges, making them look like puffy, bouncy pillows.
- Creating swirling or spiral shapes that give off a magical, whimsical vibe.
- Using rainbow arcs stacked on top of each other for a fun, playful tree top.
- Blending different colors inside the canopy, shifting smoothly between hues for extra depth.
Outlining everything with thick black lines gives it that classic cartoon punch—totally eye-catching and super fun!
Whimsical Beach Days
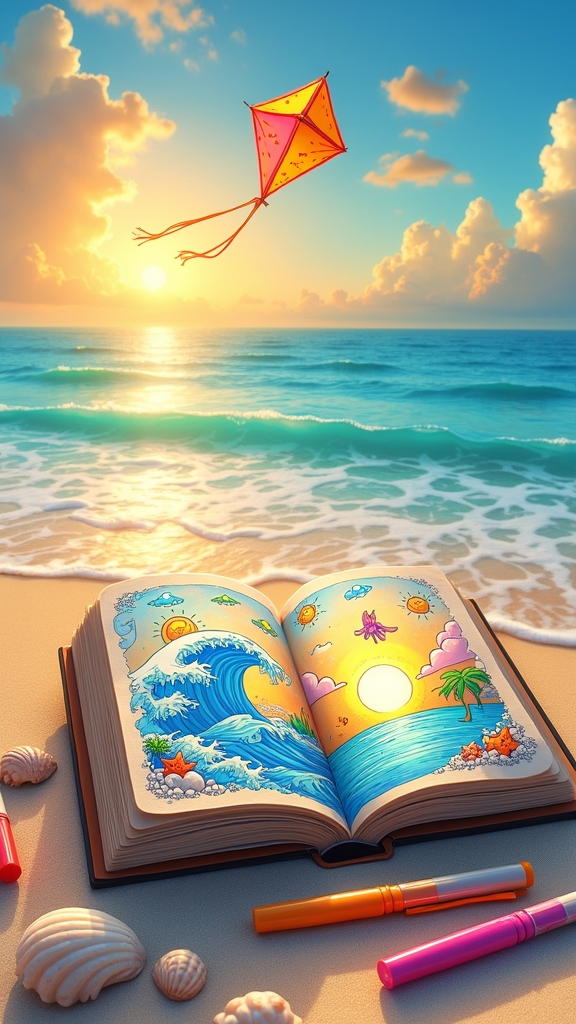
Few things scream summer fun quite like a wild, colorful beach scene packed with quirky details. Imagine buckets overflowing with shells, towels in wacky prints, and a sun so bright it looks like it’s laughing.
With Posca paint pens, artists can splash vibrant colors everywhere—rainbows in the sky, goofy clouds drifting by, and seashells that practically sparkle. Blending colors makes the sand look soft and the sea even cooler, while thick black outlines make every little object pop off the page.
Throw in a crab with sunglasses or a starfish doing a dance, and suddenly the whole scene feels alive! Sharing these playful masterpieces online is a blast, too—nothing beats showing off your beachy creations to fellow art fans.
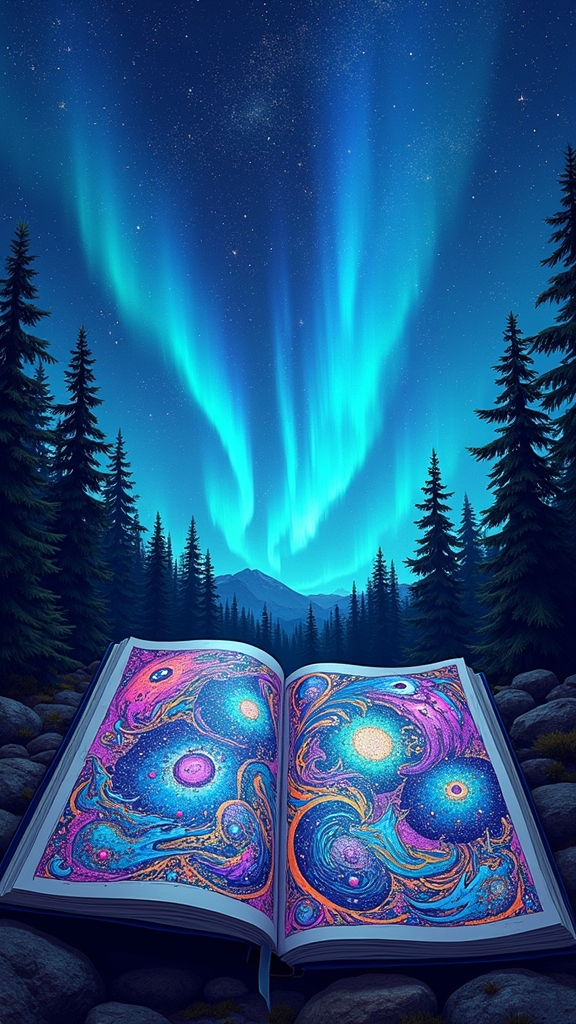
Cosmic Galaxy Backgrounds
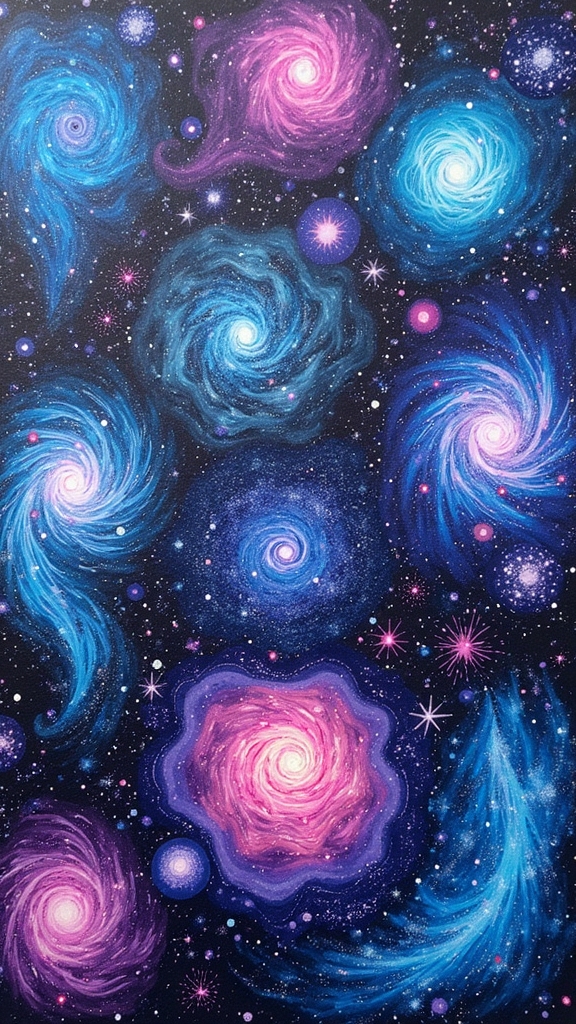
Galaxy-making with Posca pens is like revealing a whole universe right on your desk—seriously, it’s magic in marker form.
Creating galaxies with Posca pens turns any surface into a cosmic masterpiece—pure magic and creativity at your fingertips.
To craft a cosmic galaxy background, the process starts simple but gets wild pretty fast. Begin with a black base layer—think of it as the dark, endless space waiting to be filled.
Then, pick out those vibrant Posca colors: purples, blues, and pinks work wonders blended into that black, forming wild nebula clouds. For an out-of-this-world touch, white Posca paint can be used to flick on stars or sketch distant planets.
Here’s a quick guide:
- Lay down a solid black Posca base.
- Blend purples, blues, and pinks for nebula effects.
- Add white stars and planets.
- Let each layer dry before adding more.
Floral Doodle Borders
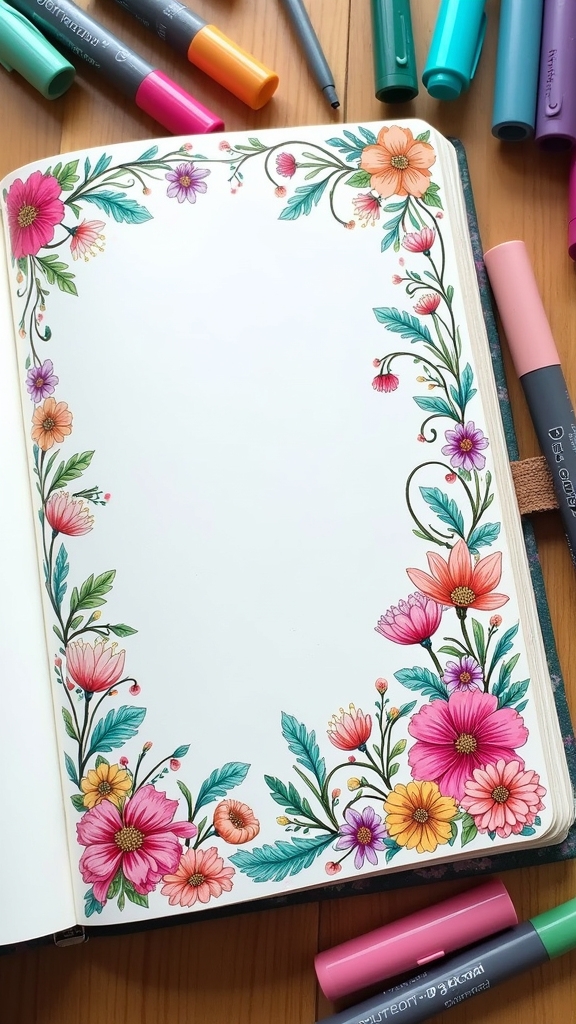
Floral doodle borders are where Posca paint pens really get to show off, especially when wild color palettes come into play and every flower can be a surprise.
Mixing up flower shapes—maybe a daisy here, a funky tulip there, and who knows, even a rose with oversized petals—keeps things interesting and just a little unpredictable.
Layering extra details, like bold outlines or overlapping vines, adds awesome depth, so your page edge doesn’t just look good, it practically pops right off the paper.
Choosing Vibrant Color Palettes
When it comes to making doodle borders pop, picking the right colors is like choosing the perfect outfit for your art—bold, bright, and totally attention-grabbing. A vibrant color palette is key for floral doodle borders, especially when using Posca paint pens. These pens deliver super bold lines, so your flowers won’t fade into the background.
To really make your doodles stand out, try these four tricks:
- Choose complementary colors for maximum contrast and energy.
- Blend shades of the same color for smooth, eye-catching shifts.
- Add highlights and details with a white Posca pen for a punch of brightness.
- Play with contrasting colors side-by-side for fun, textured effects.
With these moves, even the simplest border becomes a real show-stopper!
Mixing Flower Shapes Creatively
A border packed with all kinds of flower shapes is like a garden party for your sketchbook—seriously, why settle for just daisies when you can have tulips, roses, and weird little blossoms all hanging out together?
Mixing flower shapes keeps things interesting and makes your border pop with personality. Grab some Posca paint pens and start outlining your favorites, then color them in with wild, vibrant shades—don’t worry about being too neat!
Try blending colors right on the petals for a cool, dynamic look. If you’re feeling wild, use a bottle cap or a sponge to stamp out some funky patterns and textures. Toss in mini leaves and tiny blossoms using a contrasting color, and suddenly, your sketchbook’s got major flower power.
Layering Details for Depth
Now that the flower shapes are working together like a team of garden superheroes, it’s time to make those borders seriously pop by adding layers and details.
Layering details isn’t just about stacking flowers—it’s about making your border look deep, colorful, and full of life. By starting with the biggest flowers and working your way down to the tiniest petals, you can turn a flat doodle into a blooming masterpiece.
Here are four ways to make your floral borders leap off the page:
- Start with large blooms, then add smaller flowers and leaves for depth.
- Use contrasting colors for each layer so every flower stands out.
- Vary line thickness—thick for foreground, thin for background.
- Add highlights and accents with a white Posca pen for extra sparkle!
Neon City Skylines
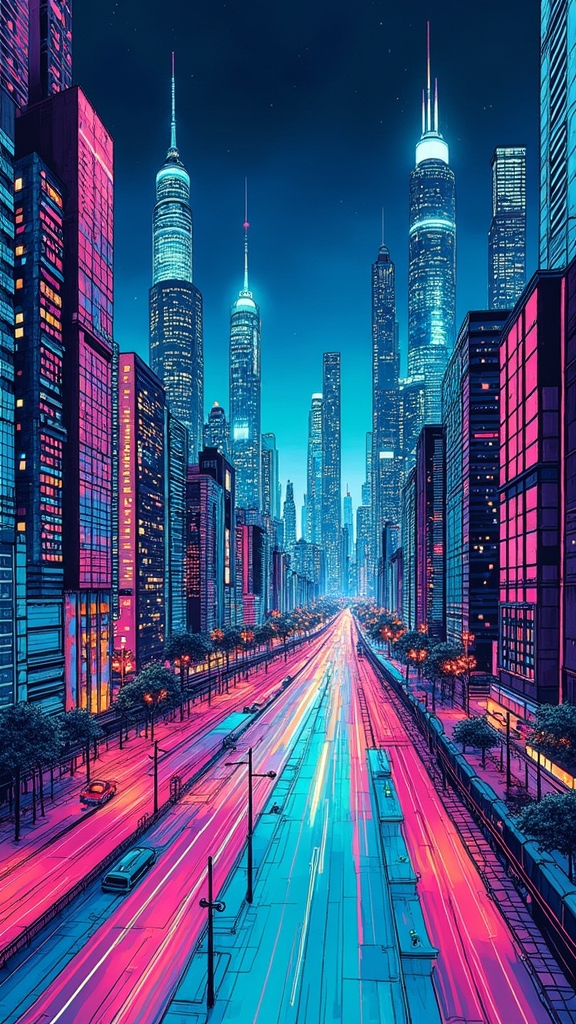
Even with just a few Posca pens and a little imagination, anyone can turn a blank page into a glowing neon city skyline that looks like it came straight out of a video game.
Start by sketching out the buildings with a black Posca pen on a dark background—this makes the neon colors pop like crazy!
Begin your city skyline by outlining buildings in black on a dark background—your neon colors will seriously pop off the page!
Next, grab those bright pinks, greens, and blues, and fill in the buildings, layering colors for extra depth. For windows and neon signs, put down some white first, then layer on neon shades for a seriously bright effect.
Blend colors to create a cool sunset or bustling night sky. Don’t forget to add final pops of white for highlights, making your city skyline absolutely shine.
Animal Portrait Pop Art

Ever wondered what your favorite animal would look like with a wild, rainbow mane or bright blue fur?
Animal portrait pop art is all about turning ordinary pets and creatures into superstars with bold paint and graphic outlines. Using Posca paint pens, artists can create sharp edges and crazy bright colors, making every whisker or feather pop off the page.
Want to make your sketchbook roar with personality? Try these four steps:
- Pick a limited color palette, choosing high-contrast shades for maximum impact.
- Outline your animal with thick, graphic lines, just like a comic book hero.
- Add patterns or funky textures inside the fur, scales, or feathers for extra fun.
- Experiment with bright or patterned backgrounds to make your animal portrait truly stand out.
Vibrant Food Illustrations
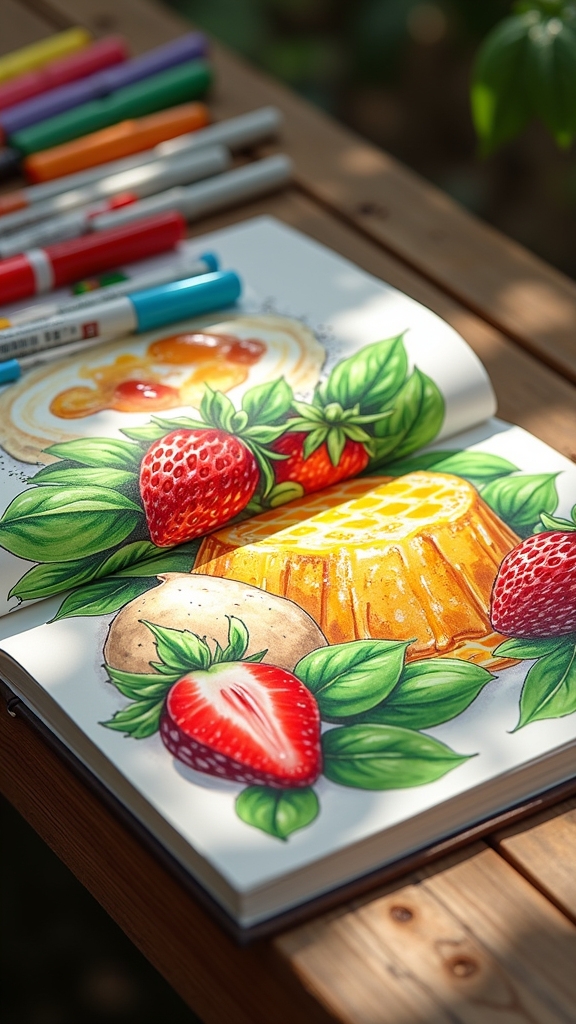
Juicy strawberries, gooey pizza slices, and rainbow-swirled donuts—food illustrations are a feast for the eyes when Posca paint pens get involved.
With their vibrant colors, these pens can turn even a simple banana into a superstar. Artists can play with bold shades, layering and blending to make oranges look extra juicy or strawberries practically burst off the page.
Adding little cartoon faces or funny expressions brings a playful vibe, making each snack in your sketchbook feel like a character at a party. Contrasting backgrounds help each food pop, and a touch of white Posca on top adds highlights that look almost good enough to eat.
It’s art that’s fun, bold, and totally mouthwatering—no kitchen required.
Underwater Ocean Worlds
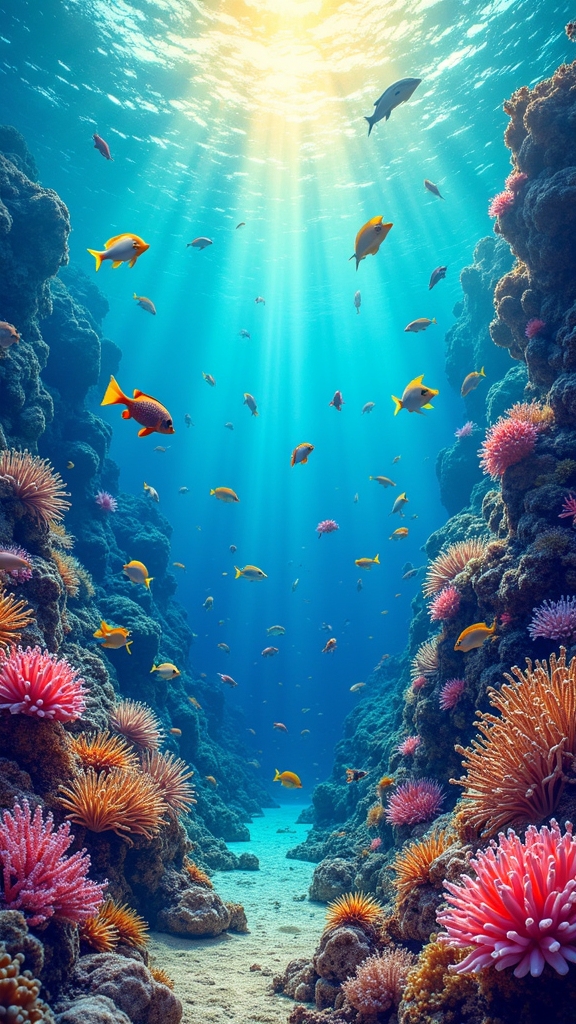
A splash of ocean blue can turn any page into a portal to a magical underwater world. Anyone can plunge into this creative sea using Posca markers—no scuba gear required! That’s one way to make your sketchbook pop.
Start with a bold blue background, letting it dry before exploring these steps:
- Draw colorful fish and sea creatures—octopuses, turtles, even a goofy crab—using vibrant colors for a lively vibe.
- Blend and layer colors to create coral reefs and underwater textures, outlining with black for dramatic effect.
- Add bubbles and twisting seaweed with lighter shades, giving depth and movement.
- Highlight with white—think sun rays filtering down, making the ocean scene glow.
If you make a mistake, just layer over it—Posca colors are super forgiving!
Layered Rainbow Landscapes
Once the ocean waves and shimmering fish have splashed across the page, it’s time to let the sky show off for a change. Layered rainbow vistas are the perfect way to make your sketchbook burst with color and cheer.
Start with a bold blue background—think of it as the stage for your rainbow stars. When the blue dries, grab your Posca pens and draw overlapping rainbow arcs, blending the colors so every layer feels smooth and magical.
Don’t stop there! Add playful clouds, a grinning sun, or even a zany lightning bolt to make your scene pop. A white Posca pen works wonders for highlights, making colors brighter than a double rainbow after a storm.
Check your masterpiece for harmony—let those layers sing!
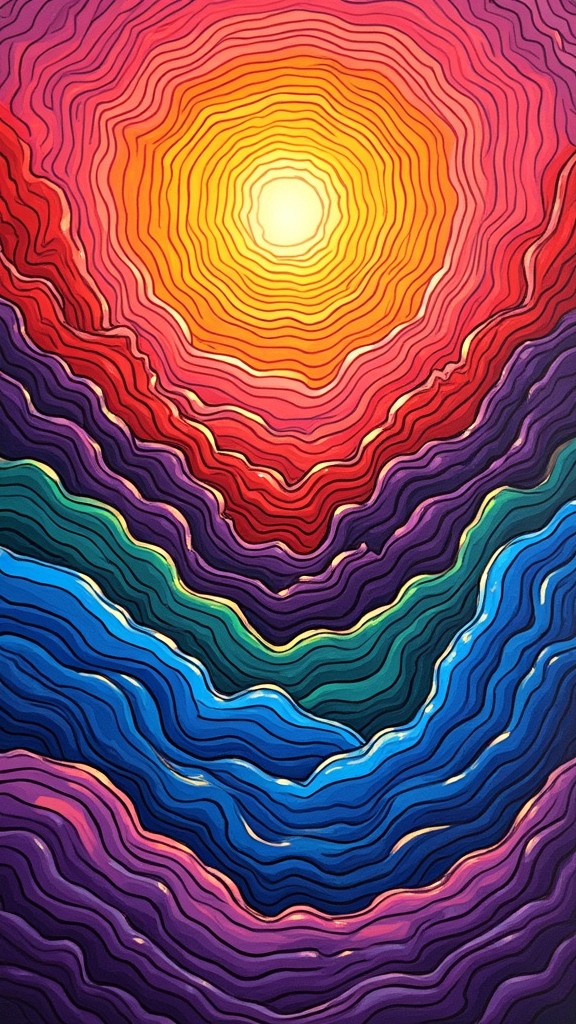
Magical Night Skies
Magical night skies are all about layering deep cosmic blues, then going wild with pops of color for vibrant shooting stars that streak across the darkness.
Blending moonlit clouds with purples and whites gives everything a dreamy, otherworldly vibe—like your paper just turned into outer space.
Add a few sparkly details, and suddenly, your sky looks like it’s hiding a secret or two.
Layering Deep Cosmic Blues
Even though outer space might seem totally out of reach, anyone can create a magical night sky just by layering different shades of deep cosmic blues with Posca pens. The process is fun, a little mysterious, and honestly, it feels like you’re painting the universe right onto your sketchbook!
To really nail the effect, try this approach:
- Start with a solid layer of navy blue Posca paint as the base for your night sky.
- Gradually blend in shades of blue, purple, and even a bit of black to build up that delicious cosmic depth.
- Clean your pen tips on scrap paper between colors for smooth, vibrant shifts—no muddy messes!
- Use a white Posca pen to add stars, planets, and those dreamy celestial details.
Adding Vibrant Shooting Stars
After building up those deep cosmic blues, things are about to get even more exciting—because every awesome night sky needs a shooting star or two racing across it. Drawing vibrant shooting stars with Posca pens is really easy and super fun. Start by outlining a star shape in white against the dark background. That contrast? Instantly magical. For the trailing tail, blend yellow, orange, and pink—layer them on a white base for a glowing effect that totally pops! Don’t forget to add tiny white or metallic dots nearby for twinkling stardust. Want your shooting stars to look 3D? Shade the edges with a darker color to give some shadow. Check out this table for a quick shooting star guide:
| Step | Tool Needed | Tip |
|---|---|---|
| Outline Star | White Posca | Bold, crisp lines |
| Blend Tail | Yellow, Pink | Layer for glow |
| Add Twinkles | Gel Pen | Sprinkle randomly |
| Shadow Edges | Dark Posca | Soft, blend gently |
Blending Moonlit Clouds
When the night sky needs that extra touch of dreamy, nothing beats painting moonlit clouds that look like they’re drifting right off the page. Blending moonlit clouds with Posca markers is all about capturing that magical, glowing vibe.
Start with a dark background—think deep blue or black. Then, layer on white and gray Posca paint to build that soft, glowing cloud effect. Don’t be afraid to get a little messy; blending purple and gray into the white adds awesome depth.
For pro-level results, try this:
- Paint the background dark and let it dry.
- Layer white and gray paint for fluffy clouds.
- Blend softly with a sponge or your fingers.
- Add tiny white dots for twinkling stars.
Let everything dry before outlining. Voilà—nighttime magic!
Funky Geometric Shapes
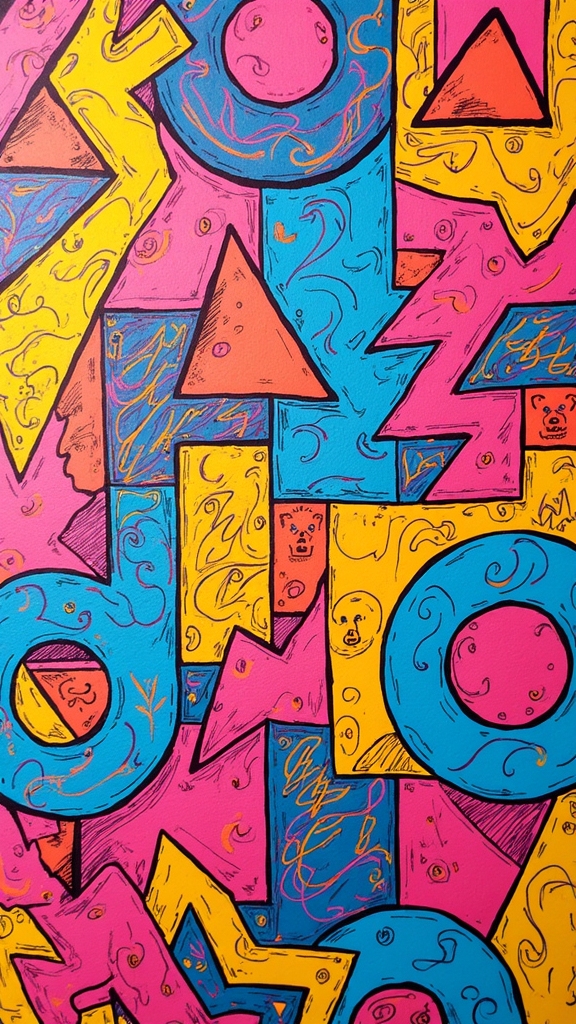
Triangles, circles, and squares might sound like the building blocks of a boring math lesson, but with Posca paint pens, they turn into a wild party of shapes and colors.
Funky geometric shapes can take over your sketchbook when you start mixing and matching those basics in surprising ways. Try overlapping them and suddenly, your page has depth and a touch of mystery—like a puzzle waiting to be solved.
Tracing around random objects, like bottle caps or rulers, lets you invent all sorts of cool patterns with perfect lines. Don’t forget to outline your shapes with a bold black Posca; it makes them pop like comic book heroes.
Fill each shape with stripes, dots, or gradients, and you’ll create art that’s totally your own.
Playful Emoji Faces
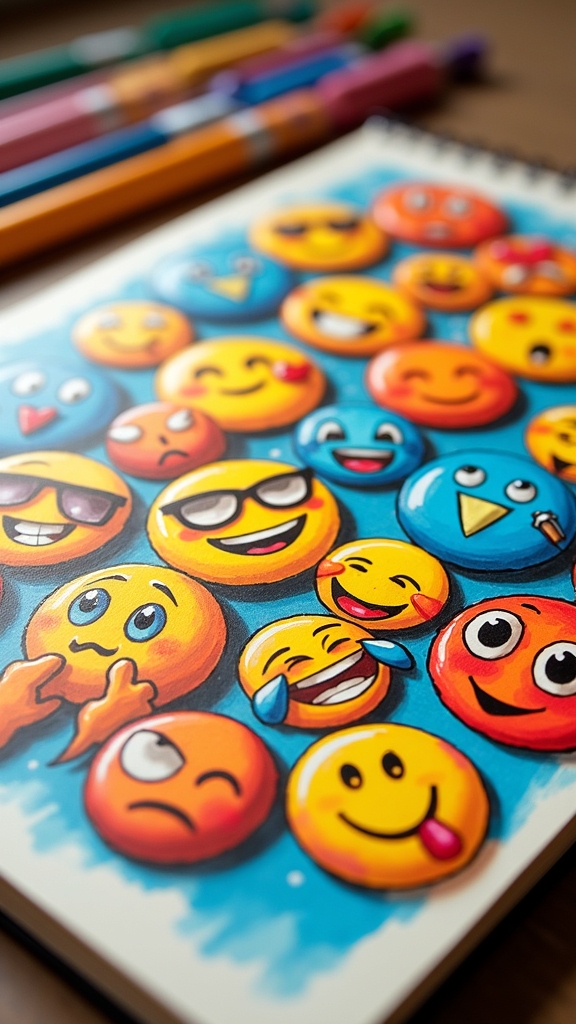
Playful emoji faces are a blast to make with Posca pens, especially when you go wild with expressive eyes and goofy mouths that totally steal the show.
Layering bright colors gives each face a mood, and it’s almost impossible not to smile when you add fun background accents like little hearts or comic-style stars.
With every doodle, there’s a chance to show off just how silly or dramatic an emoji can get—sometimes all in one sketch!
Expressive Eyes and Mouths
Emoji faces are like little windows into wild emotions, and drawing expressive eyes and mouths with Posca pens can turn a plain page into a buzzing party of feelings.
With bold line work, artists can capture every dramatic glare, goofy grin, or silly smirk. Getting started is all about experimentation, so here’s a handy list for upping your emoji face game:
- Start with simple shapes for eyes and mouths—think ovals, circles, or squiggles.
- Add depth by blending lighter colors over dark ones within the eyes, making them pop.
- Use a thick black Posca pen to outline features, giving everything a cartoonish edge.
- Don’t forget extras like eyebrows, blush, or even funky hats—these tiny details bring personality!
Mistakes? Just zap them with a white Posca pen!
Vibrant Color Layering
A splash of color can turn even the most ordinary doodle into something totally electric, and that’s where vibrant color layering with Posca pens really shines.
To make playful emoji faces pop, artists start with a light pencil sketch, then lay down a coat of white paint as a base—think of it as priming a canvas, but way more fun.
Now, the real magic comes with layering vibrant colors. Blending two colors while they’re still wet lets you create smooth shifts and wild new shades, so every emoji face is unique.
Using different Posca pen nib sizes, you can add tiny accessories or silly details (like sunglasses or hats). Don’t color everything—leave some spots blank for contrast and a burst of personality!
Fun Background Accents
Sometimes, sketches just need a little extra spark, and that’s where tossing in some background emojis totally changes the game. Playful emoji faces make fun accents that instantly liven up any sketchbook page.
With Posca paint pens, artists can create a rainbow of expressions, giving each emoji its own quirky personality. Blending colors around the emojis helps them melt into the background, making the whole page look more polished and intentional.
To make those faces pop, outlining with a black Posca pen adds definition and a bold finish. Here’s how to take background accents to the next level:
- Mix up emoji expressions and colors for variety.
- Blend colors softly around each emoji for smooth shifts.
- Play with size and placement for visual balance.
- Outline with black for extra pop!
Fantasy Creature Mashups
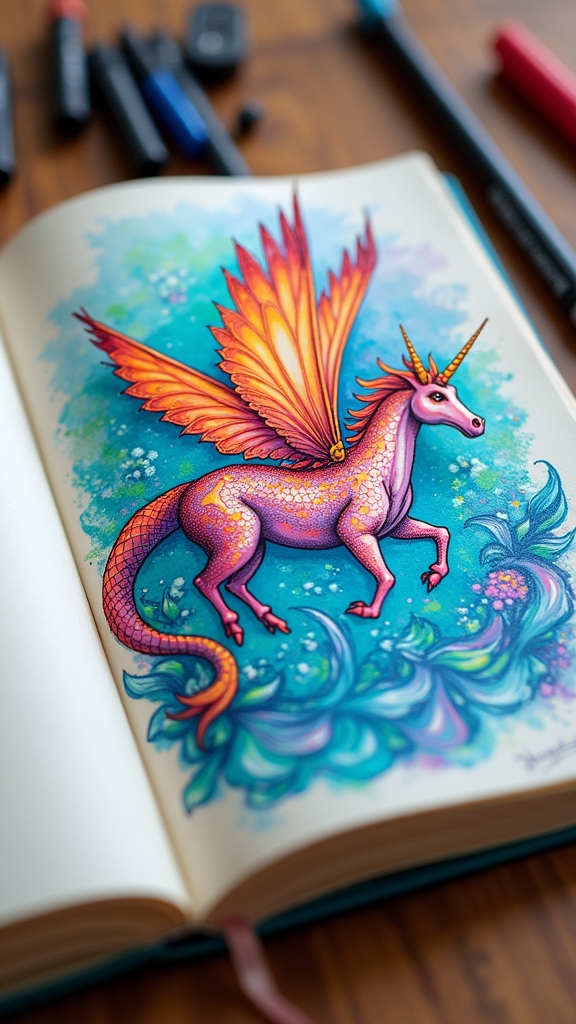
Magic happens when fantasy creatures collide, and that’s exactly what makes mashups so exciting. Imagine a dragon with a unicorn’s glowing horn or a mermaid with phoenix wings—fantasy creature mashups let artists invent wild new beings that don’t follow any rules except creativity.
Using Posca paint pens, it’s easy to blend wild colors for scales, fur, or feathers, and to add details like sparkles or fierce claws. Start with a rough sketch, either freehand or by tracing parts from favorite mythical creatures.
Want your mashup to really jump off the page? Try using a bright, gradient background to make every detail pop. The best part: there’s no wrong way to mash up fantastical creatures—just let your imagination run wild!
Dreamy Cloudscapes
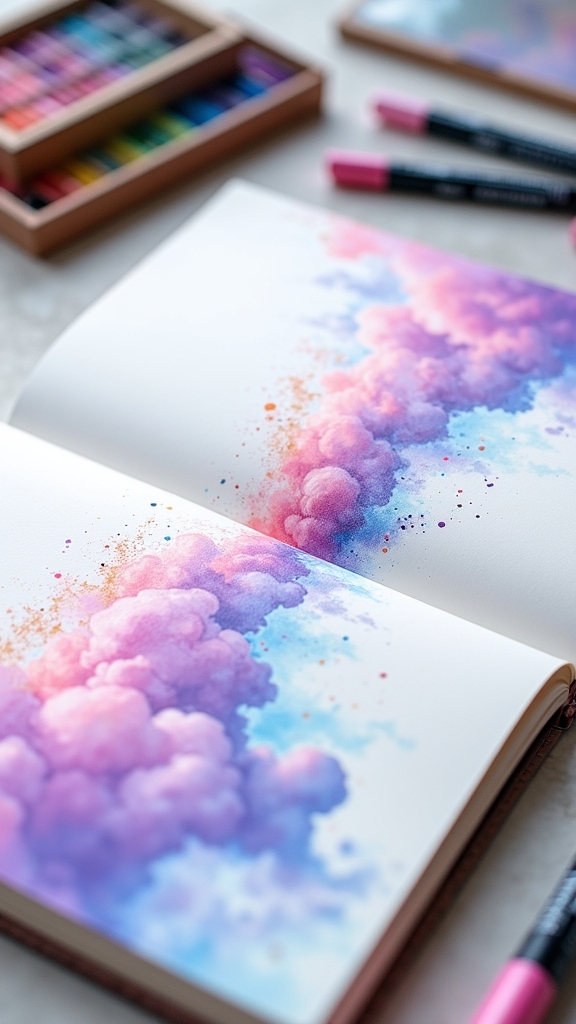
Even when the real sky looks kind of boring, drawing a dreamy cloudscape with Posca pens can make things feel totally magical—like you’ve got your own weather remote.
It’s not about making clouds look realistic; that’s okay! The fun is in creating a sky that feels like it came from a dream. Here’s how to level up your sketchbook with a cloudscape:
- Start with a soft gradient background—think light blue fading into pastel pink for those sunset vibes.
- Use white and light gray Posca pens to layer fluffy cloud shapes, adding depth and texture.
- Blend in hints of lavender or peach on the cloud edges for a whimsical, otherworldly effect.
- Outline clouds with a fine-tip black pen and sprinkle in stars or a crescent moon for extra magic.
Bold Botanical Leaves

Now it’s time to go bold with botanical leaves, where Posca pens truly shine!
By layering vibrant greens and earthy colors, anyone can make leaves look lush and almost pop off the page, especially when you add some funky outlines for those stylized shapes.
Mixing in thick or wavy black lines around the edges gives each leaf a cool, cartoon vibe that’s hard to miss.
Layering Vibrant Leaf Colors
Once the outline of bold botanical leaves is sketched with a light pencil, the real fun begins—layering vibrant colors with Posca pens. That’s what’s so cool about Posca: their colors are seriously bold!
To make those leaves pop, artists get to experiment with blending greens, yellows, and even blues. The trick is to let every layer dry before adding the next, so the colors stay crisp, not muddy.
Here’s a simple guide to nailing those vibrant leaf layers:
- Start with a base layer of green, filling the leaf shape.
- Add yellow or blue accents for depth—go wild!
- Use a white Posca pen to highlight veins and edges.
- Mix big, bold leaves with tinier ones for a lively look.
It’s all about experimenting!
Stylized Leaf Shape Outlines
Leaf outlines are where the magic of bold botanical art really starts to take shape. With stylized leaf shape outlines, artists can let their creativity run wild.
Grab a Posca paint pen and begin with a chunky, dramatic outline—the kind that practically shouts, “Hey, look at me!” Play around with bright colors, blending them together or letting them clash for a funky vibe.
Thick black outlines give the leaves a cartoonish twist, making them pop right off the page. Want to level up? Add veins, dots, or squiggly patterns inside the leaf shapes for extra flair.
Mixing different sizes and directions in one sketchbook spread adds energy, like a dance party of leaves. Go bold, get weird, and watch your sketchbook bloom!
Fun Patterned Lettering

Bored with plain letters? Let’s supercharge your sketchbook with fun patterned lettering using Posca paint pens!
These markers are perfect for layering bold colors and wild patterns, making your words jump off the page like they’re at a lettering party. Want to know how? Here’s a quick guide:
- Layer stripes, polka dots, or zigzags inside each letter for maximum excitement.
- Pick a background color that pops—black or neon shades work wonders for making your design stand out.
- Use a black or white Posca pen to outline each letter, adding cartoonish flair and crisp definition.
- Try blending colors inside the letters for a gradient effect, creating letters that practically glow.
Get ready, because your words are about to steal the show!
Mystical Forest Scenes
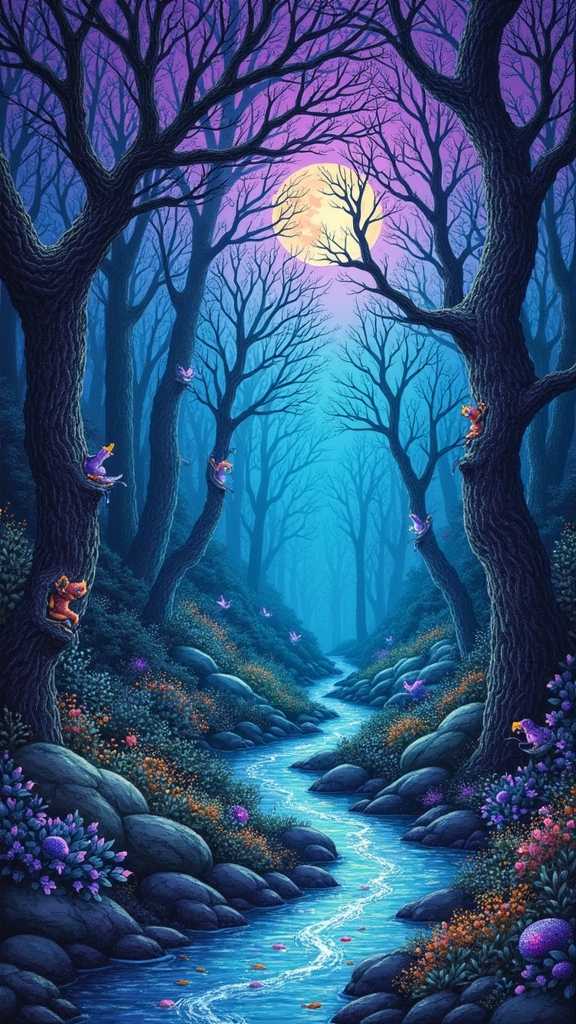
After jazzing up letters with patterns and color, it’s time to step into a whole new world—a mystical forest that looks like it popped straight out of a fantasy storybook.
Imagine using deep greens and moody blues from your Posca paint pens to create trees and tangled vines, blending the colors so the forest feels endless and alive.
Add tiny details—leaves with wild shapes, mushrooms that could be fairy umbrellas, even little magical creatures peeking from behind roots.
Don’t forget the sky! A glowing moon or a sprinkle of stars above the treetops makes the whole scene shimmer with mystery.
Layering and blending your colors will help everything look dreamy and enchanted.
In mystical forest scenes, your imagination is the wildest thing growing!
Retro Video Game Art
While some might think retro video game art is just a bunch of tiny squares, there’s actually a whole world of creativity packed into those pixels.
Using Posca pens, artists can bring those blocky heroes and power-ups from classic consoles to life, but with a twist—lots more color and personality! Creating these nostalgic images isn’t just about doodling random boxes; it’s about strategy and style.
Here’s how to level up your sketchbook:
- Sketch a simple grid to keep proportions true to the original pixel art.
- Use bold outlines with the pens for that classic, punchy look.
- Blend and layer colors for extra depth, making your art pop.
- Add fun details like health bars, pixelated clouds, or quirky power-ups.
Game on—with pens!
Colorful Streetwear Fashion
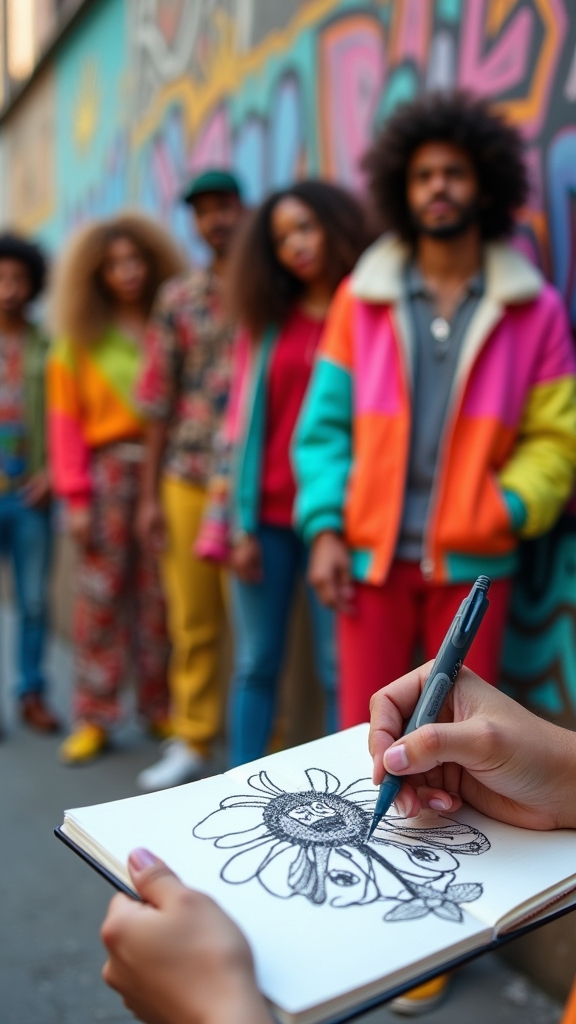
Everywhere you look in the city, there’s a burst of color and coolness coming from streetwear fashion. It’s like the sidewalks have turned into runways where everyone’s showing off their boldest looks!
Colorful streetwear fashion is all about mixing vibrant colors, wild patterns, and oversized shapes that practically shout, “Look at me!” Think graphic tees with crazy prints, big hoodies, and sneakers that could blind you in the best way possible.
Layering is key—pile on different textures and patterns until your outfit feels like a walking piece of art. And don’t forget the accessories: bucket hats, crossbody bags, and sneakers that pop.
Streetwear’s even teamed up with big-name designers, making these styles as cool in magazines as they are in real life!
Inspiring Quote Posters
When someone walks into a room and spots an inspiring quote poster bursting with color, it’s almost impossible not to smile—or at least feel a little more pumped up.
With Posca paint pens, anyone can turn simple words into bold, eye-catching art that’s kind of like a pep talk for your wall. To make those inspiring quote posters truly pop, try these four tricks:
- Use vibrant Posca colors and creative lettering to let the message shine.
- Blend colors in the background for extra depth and texture—clouds and abstract shapes work great.
- Give your quote some punch by outlining the words with a thick black Posca pen.
- Snap a pic and share your masterpiece online; you might inspire someone else to make art that’s kind, too.
Frequently Asked Questions
How Do You Refresh Posca Pens?
To refresh Posca pens, one should shake them well for proper color mixing, press the nib to release paint, clean the tip regularly, store horizontally, and if necessary, soak the nib in water to restore flow.
What Is the Best Thing to Draw on With Posca Markers?
When considering the best thing to draw on with Posca markers, artists often explore creative surfaces such as acrylic, glass, metal, ceramic, and watercolor paper, each enhancing the markers’ vibrancy, texture, and versatility in unique ways.
Is POSCA Ok on Skin?
Regarding Skin Safety, Posca paint pens are generally safe for small skin applications due to their non-toxic, water-based formula. However, patch testing is advised, and prolonged or extensive use should be avoided to minimize possible irritation or sensitivity.
Why Are Poscas so Expensive?
Posca pens are expensive due to quality assurance in their manufacturing, vibrant water-based acrylic paint, durable nibs, and versatility on multiple surfaces. Their wide color range and strong brand reputation further justify the higher price point for artists.
Conclusion
With these 22 Posca drawing ideas, anyone’s sketchbook can go from “meh” to “wow” in no time. Whether someone’s into space scenes or funky tie-dye, there’s something wild and new to try. Mistakes? Totally fine—half the fun is in experimenting and laughing at the goofy stuff. So, grab those markers, turn up the music, and let creativity take the lead. Who knows? The next masterpiece might just be a doodle away!
Leave a Reply